Wednesday, November 24, 2010

InstantRails + Redmine

I just discovered Redmine, and it looks quite promising to me as a project development tracking system.

InstantRails

Since I’m a big fan of portable applications, I tried to play with Redmine using InstantRails, but had some trouble getting it to run, since InstantRails uses some old versions of some required gems. So after upgrading gems to 1.3.7 and rack to 1.0.1 and finding some old version of the MySQL lib libmysql.dll v5.0 I got it all working nicely locally and portable. If anyone would like to play with it: download InstantRails 2.0 + Redmine 1.1.1 (42MB). I removed some parts of the gems documentation files to make it smaller.

The InstantRails package contains MySQL, Apache, Ruby and Rails. To use it, just run ‘InstantRails.exe’, the Apache and MySQL servers will automatically be launched.

 InstantRails

During startup, InstantRails may request to regenerate the configuration because of a folder location change. Just press ‘Yes’. If Apache doesn’t start automatically, make sure the ‘apache\logs’ folder exists.

Next click on the ‘i’ button, in the menu chose ‘Rails Applications’ –> ‘Manage Rails Applications’, select ‘Redmine’ push the button ‘Start with Mongrel’.

ManageRailsApplications

StartMongrel

A command window will open up and when it’s loaded you can navigate to http://localhost:3003 and start using your own personal portable Redmine. (default login: admin, password: admin). To manage the database, phpMyAdmin is included as well, just navigate to http://localhost/mysql.

If you don’t care to have it portable, you could as well install Ruby on Rails and Redmine using this 1 minute guide.

Plugins

Redmine 2 is included, but I added the following plugins I found interesting as well:

  • Codereview: code review comments can be added in repository within Redmine. It has a project tab with an overview of the code review comments as well
  • Hudson: project tab for Hudson administration
  • Issue due date: automatically set issue due date to the version due date
  • Timesheet: create a timesheet with overview of tracked timings
  • Time Tracker: easily track timings while working on issues
  • Wiki notes: extra wiki options, example created
  • Wiki tabs: possibility to add a project tab linked to wiki page, not configured yet
  • Tab: custom project tab configuration, configured to get the Sonar project information page

Demo

Within Redmine I configured roles, issues states, permissions and a workflow. I set up different users, projects and issues to be able to play with different configuration settings. Each user is configured to use the same password as the username: admin, teamleader, developer, etc. (see administration console). It is very easy to configure which role can perform what tasks and see specific content within Redmine.

Administration

Creation and management of issues is straightforward. It has a good integration of time tracking, at every update of an issue, the user can immediately update the time tracks.

UpdateIssue

With the time tracker plugin, it is even easier to track your timings. With an issues selected, you can easily let Redmine keep track of the time you spend on that issue by using the start/stop links at the top.

TimeTracker

Reporting

An important part of an issue tracking system is the reporting capabilities.

A summary with the number of issue in open or closed state can be seen:

Summary

In the list of issues, filters can quickly be added and columns can be chosen:

IssuesFilter

In the roadmap overview, all versions / planned version of the project are listed with an overview of their related issues:

Roadmap

The activity overview shows the activities performed within a project.

Activity

The spent time within a project can be viewed in an overview:

SpentTime

But custom reports can be created on the fly as well:

SpentTimeCustomReport

SpentTimeCustomReportFilters

With the Timesheet plugin, an overview of all projects, all users, etc. of the spent time can be generated easily on the fly:

Timesheet

Integration

Specific plugins exist to integrate the Redmine issue lists with TortoiseSVN and TortoiseGIT: Tortoise Redmine Plugin.

For full integration, follow this manual for the BugTraq properties configuration.

TortoiseIntegration

Points of improvement

One thing I noticed during my tests: if an issues is updated and a user changes the state of the issue, he still can select any user to assign it to. In my opinion, only users able to make changes on the selected target state of the issue, should appear in the list of users to assign the issue to. An issue tracking system should enforce all constraints of the workflow to make sure an issue can’t come in an invalid workflow state (eg. assigned user can not change the status). But this problem occurs on most tracking systems I checked (Track+, Jira, etc.). See this feature request, I checked the plugin development, but so far I couldn’t make it work myself yet.

Update 31/01/2011: InstantRedmine package updated to Redmin 1.1.1

Tuesday, November 2, 2010

Excel lookups in formulas

Different solutions exist to work with looked up data in Excel formulas: LOOKUP, VLOOKUP, HLOOKUP.

  • LOOKUP(value, lookup_range, result_range): searches for value in the lookup_range and returns the value in the result_range that is in the same position
  • VLOOKUP(value, table_array, index_number, not_exact_match ): searches for value in the left-most column of table_array and returns the value in the same row based on the index_number.
  • HLOOKUP(value, table_array, index_number, not_exact_match ): searches for value in the top row of table_array and returns the value in the same column based on the index_number.

But I needed yet some other lookup functionality, something like SEARCHHLOOKUP(search_in_text, lookup_range, result_range) where values from the lookup_range are searched in the text of search_in_text and if found the value of the result_range with the same column as were it was found is returned.

I wanted to be able to define some categories, with keywords linked. If a keyword occurs in a sentence, I wanted the category name as result. and I wanted to easily add new keywords for each category, without changing the formula. For example sheet CATEGORIES:

A B
Fruit Food
1 2
1 apple chocolate
2 banana milk


Next I have a cell with value: "Apple belongs to category" In another cell I want a formula (no VBS) that would result in the category name: "Fruit". For example sheet EXAMPLE:

A B
1 Apple belongs to category Fruit
2 Chocolate belongs to category Food


(Example SearchLookup.xlsm)

Since I need to search for the keyword in a sentence, I use the SEARCH(search_text, search_in_text, start_position ) function. If the result is bigger than 0, the keyword was found (not case sensitive). But if the keyword was not found, an error value #VALUE will be returned. To catch this error value, the function IFERROR(value, value_if_error) can be used. So I get this function: {=IFERROR(IF(SEARCH(CATEGORIES!$A$2:$A$5;EXAMPLE!$A1)>0;CATEGORIES!A$1);"")}

But this will only lookup keywords in my first column of Categories, while I want many more. I solved this by attaching a weight to each category and using the formula CHOOSE(position, value1, value2, ... value_n ) to select the category name corresponding it's weight. To ignore the error values when the keyword is not found, I return 0 if an error occurs and the category weight when the keyword was found, so a MAX on that array will result in the matching category weight. To make sure that 0 is returned, only when the keyword is not found, I add any single character (µ in this case) in front of the text to search in, else 0 could be returned if the text to search in starts with the text we are searching. Now the search has to be bigger than 1 when the keyword is found.

The result is this formula: {=CHOOSE(MAX(IFERROR(IF(SEARCH(Categories!$A$3:$A$6;"µ"&Example!$A1)>1;Categories!$A$2;0);0);IFERROR(IF(SEARCH(Categories!$B$3:$B$6;"µ"&Example!$A1)>1;Categories!$B$2;0);0))+1;"";Categories!$A$1;Categories!$B$1)}

Since we apply the SEARCH function on an array, the complete formula has to be an array formula, so don't forget to press CTRL+SHIFT+ENTER to save as an array function and get the "{=...}" signs around the formula.

So using a combination of CHOOSE, MAX, IFERROR, IF and SEARCH functions I can lookup category names base on keywords and the keywords can be added dynamically. The only "problem" left is that I need to change my formulas when a new category is added, but at least not when adding keywords in a category.

To solve this last problem, I ended up creating a 'User defined function' SEARCHHLOOKUP(search_in_text, lookup_range, result_range, (result_range_index)):

Function SearchHLookup(Search_in_text As Variant, Lookup_range As Range, Optional Result_range As Range, Optional Result_range_index As Integer)
'''''''''''''''''''''''''''''''''''''''
'Written by myT - http://myTselection.blogspot.com
'Values from the lookup_range are searched in the text of search_in_text
'If a match is found, the value of Result_range in the same column and top row (or result_range_index) is returned
'Example:
'A B
'1 2
'3 4
'if 2 or 4 is found in Search_in_text, B will be returned
'if 1 or 3 is found in Search_in_text, A will be returned
'if none is found, empty string will be returned
'''''''''''''''''''''''''''''''''''''''
Dim iRow, startRow As Integer
Dim iColumn, startColumn As Integer
If Result_range Is Nothing Then
startRow = 2
Else
startRow = 1
End If
startColumn = 1
For iColumn = startColumn To Lookup_range.Columns.Count
For iRow = startRow To Lookup_range.Rows.Count
If Not (Lookup_range(iRow, iColumn) = "") Then
If (InStr(1, Search_in_text, Lookup_range(iRow, iColumn), 1) > 0) Then
If Result_range Is Nothing Then
SearchHLookup = Lookup_range(1, iColumn)
ElseIf Not (Result_range_index = 0) Then
SearchHLookup = Result_range(Result_range_index, iColumn)
Else
SearchHLookup = Result_range(1, iColumn)
End If

Exit Function
End If
End If
Next iRow
Next iColumn
SearchHLookup = ""
End Function


So in my example, the function I use now has been simplified to:


=SearchHLookup(A1;Categories!$A$3:$B$4;Categories!$A$1:$B$1;1)


Of course, a SearchVLookup could be made easily as well:


Function SearchVLookup(Search_in_text As Variant, Lookup_range As Range, Optional Result_range As Range, Optional Result_range_index As Integer)
'''''''''''''''''''''''''''''''''''''''
'Written by myT - http://myTselection.blogspot.com
'Values from the lookup_range are searched in the text of search_in_text
'If a match is found, the value of Result_range in the same column and top row (or result_range_index) is returned
'Example:
'A 1 2
'B 3 4
'if 1 or 2 is found in Search_in_text, A will be returned
'if 3 or 4 is found in Search_in_text, B will be returned
'if none is found, empty string will be returned
'''''''''''''''''''''''''''''''''''''''
Dim iRow, startRow As Integer
Dim iColumn, startColumn As Integer
If Result_range Is Nothing Then
startColumn = 2
Else
startColumn = 1
End If
startRow = 1
For iRow = startRow To Lookup_range.Rows.Count
For iColumn = startColumn To Lookup_range.Columns.Count
If Not (Lookup_range(iRow, iColumn) = "") Then
If (InStr(1, Search_in_text, Lookup_range(iRow, iColumn), 1) > 0) Then
If Result_range Is Nothing Then
SearchVLookup = Lookup_range(iRow, 1)
ElseIf Not (Result_range_index = 0) Then
SearchVLookup = Result_range(iRow, Result_range_index)
Else
SearchVLookup = Result_range(iRow, 1)
End If

Exit Function
End If
End If
Next iColumn
Next iRow
SearchVLookup = ""
End Function


The user defined function needs to be defined in a module. Example: SearchLookup.xlsm)

Thursday, September 23, 2010

Userfriendly encryption (on USB sticks)


Previously, I always used FreeOTFE to encrypt personal files on my USB sticks. The problem is that I don't find the 'FreeOTFE Explorer' very user friendly and safe, since files need to be exported before you can open them. This 'FreeOTFE Explorer' is the only way to use a FreeOTFE encrypted container on a pc with no administrator rights.
So now I found a better little tool: Rohos Mini Drive.

  • free (official 2GB encrypted disk limited for freeware, but disks created with the free Rohos Disk Browser can be as large as you want)

  • easy to use, with AES 256bit encryption

  • unique on-the-fly encryption with no administrator rights, the disk browser allows working with files as regular (double click any file to open it immediately)


Download Rohos Min Drive 2,2MB.


When setting up a USB stick with Rohos, it will copy the 'Rohos Mini.exe' and 'Rohos Disk Browser' to your USB stick. You can always use the 'Rohos Mini.exe', if it detects you have currently no administrator rights, it will automatically open the Disk Browser application (located in a hidden folder [drive]:\_rohos\rbrowser.exe).


Btw, Rohos has some other very nice applications as well, like the Rohos Face Logon to login in Windows with webcam (or see a picture of people who tried to break into your computer)...

Sunday, March 28, 2010

Exam point counter (Excel)

To help counting points during correction of the exams, I made some Excel VBS. When the exams are corrected, next to every error a -0,5 -1 or -1,5 is written, and these have to be substracted from the total points of every part. To make it possible to perform this little task one handed, I linked the 'h' key to -0,5, the 'j' key to -1 and the 'k' key to -1,5. Now the exams can be run through very fast and the result of every part is shown immediately. To keep track of the total points of every part for every student, I linked the 'x' key to save the result in a sheet with the totals. Finally, the 'c' key is linked to clear the contens of a column with all substractions of a part of the exam.


The exepected usage of the sheet:


  • fill in the totals of every part of the exam in the top most row of the first sheet (called 'Punten teller'/'Point counter').

  • (optional) if the maximum points in a part is different from the weight of that part in the complete exam, the second row in the first sheet can be used. The points will be recalculated to match the weight.

  • (optional) fill in the name of every part, for example: excercises, theory, vocabulary, etc.

  • select the cell in the fifth row of the first column an run through the exam. For each part of the exam, a next column should be used

  • while running through a part of the exam, use the keys 'h', 'j' and 'k' for every mistake in the exam, respectively substracting 0,5 1 or 1,5 points

  • when a part of the exam is finished, you can see the total points in the third row of that column

  • if you want to keep that result in the totals list, press the 'x' key, the statusbar will clearly show the changes applied in the totals list (so you don't need to switch the sheets every time to verify)

  • if you want to recount the points of that part again, press the 'c' key to clear the data of that column (exam part), without updating the totals list

  • if you want to clear the column (part of exam) and go to the next part, use the 'n' key

  • when every part is done, the points of each part will be saved in the 'Totaal'/'Total' sheet for every student, and the total is converted to a % point

  • (optional) for every student, a name can be added in the second column of the 'Totaal'/'Total' sheet

  • the total point of every part are rounded as for example 6.0; 6.1; 6.2 go to 6, 6.3,6.4,6.5,6.6 and 6.7 go to 6.5 and 6.8 and 6.9 go to 7

  • (optional) comments for the exam of every student can be added in the 'Totaal'/'Total' sheet (last column)

  • to get a nice overview of results of every student in a separate document (vakrapport/course report), a word template using Words build in MailMerge is created. It can be used in combination with a sheet based on this Excel template. The template can be updated, the result will be a separate page with points, median and comments for every individual student (a hidden sheet 'MailMerge' in the Exel template is used for this). To get best results using this template, it is advised to fill in the topics in this list marked as '(optional)'


Excel sheet template (english version, dutch 2003 version, english 2003 version) (when opening a new sheet will be created, so the template will always be kept intact)


29/03/2010: Updated template, english and 2003 versions added


04/04/2010: Updated template, added vakrapport template

Tuesday, December 22, 2009

FreeOTFE command line

FreeOTFE is a very nice freeware encryption program. It is very similar to the well known TrueCrypt application, but I prefer FreeOTFE since it has a PocketPC version and it's thus more portable.


Like I mentioned in a previous post, I use FreeOTFE in combination with Dropbox. I encrypt a complete portable DropBox folder to make sure all data and account information is kept save whenever I would lose my USB stick. This is possible since FreeOTFE can very easily be used as a portable application and thus perfect for any USB stick.


Since I use my USB stick with portable DropBox and portable Roboform2Go almost every day, I made some small batch scripts to easily start up the FreeOTFE drive and the portable applications within the encrypted volume. So far I have created these scripts:


FreeOTFEAutoLoad.bat: Batch script to mount a volume with a portable FreeOTFE, the volume to mount has to be specified as first parameter when running the script, so for example: FreeOTFEAutoLoad.bat "example.vol"


@echo off
TITLE Auto load FreeOTFE
FreeOTFE\FreeOTFE.exe /portable start /silent
FreeOTFE\FreeOTFE.exe /mount /volume %1%
exit

FreeOTFEStop.bat: Batch script to unmount all volumes that are started using a portable FreeOTFE.


@echo off
TITLE Stop FreeOTFE
:DISMOUNT
FreeOTFE\FreeOTFE.exe /dismount all /silent
IF %ERRORLEVEL% NEQ 0 GOTO DISMOUNTFAILED
GOTO STOPPORTABLE
:STOPPORTABLE
FreeOTFE\FreeOTFE.exe /dismount all /silent /force
FreeOTFE\FreeOTFE.exe /portable stop /silent
GOTO EXIT
:DISMOUNTFAILED
echo Dismount of FreeOTFE failed: %ERRORLEVEL%.
echo Make sure all locks on FreeOTFE disks are removed, then continue this process.
SET INPUT=
set /p INPUT=Press enter to try again, f to force dismount, e to exit.
if /i "%INPUT%" == "f" goto FORCEDISMOUNT
if /i "%INPUT%" == "e" goto EXIT
FreeOTFE\FreeOTFE.exe /dismount all /silent
IF %ERRORLEVEL% NEQ 0 GOTO DISMOUNTFAILED
GOTO STOPPORTABLE
:FORCEDISMOUNT
FreeOTFE\FreeOTFE.exe /dismount all /silent /force
IF %ERRORLEVEL% NEQ 0 GOTO DISMOUNTFAILED
GOTO STOPPORTABLE
:EXIT
exit

FreeOTFE - volume.bat: Batch script to automount a specific volume and launch some script from within the encrypted volume once it is mounted.


@echo on
start "AutoLoad" /wait FreeOTFEAutoLoad.bat "example.vol"

set _Target=NotFound
set _TargetName=REPLACE_THIS_TEXT_WITH_THE_EXACT_NAME_OF_YOUR_MOUNTED_FREEOTFE_VOLUME

for /f usebackq %%a in (`Drives.exe -f %_TargetName%`) do set _Target=%%a

if "%_Target%" == "NotFound" (
echo Unable to find target drive named "%_TargetName%"
goto :EOF
)
pushd %_Target%
%_Target%\SCRIPT_OR_APPLICATION_TO_BE_STARTED_FROM_THE_MOUNTED_VOLUME.bat

When launching FreeOTFE it can take some time to load all cyphers and hashes included, so I created my own archive only including the cypher and hashes I use (the most secure onces). Now FreeOTFE will launch much faster. The application "Drives.exe" is created by Scott Seligman and is used to determine the drive letter based on the name of a volume. The minimal portable FreeOTFE with all scripts above can be downloaded using this link.

Tuesday, November 24, 2009

Extra features for Log4j DailyRollingFileAppender

Log4j has some nice features and supports many appenders, but so far we never had a file appender with all features as it should be. Recently we wanted to write our own appender but before doing so we found Ryan Kimber already had the same idea and did a good job rewriting the original DailyRollingFileAppender: the CustodianDailyRollingFileAppender. On his blog he provides some info on how he updated the appender. We made some very small changes to make it completely working for us and to make sure the log file directory is created if it didn't exist.


  • make sure the directory structure to the specified log file exists

  • create a new log file for each day

  • compress log files older than today

  • remove log files older than a specified number of days


CustodianDailyRollingFileAppender.java source


Example of log4j configuration:


log4j.rootLogger=INFO, FILE
log4j.appender.FILE=com.myt.common.logging.CustodianDailyRollingFileAppender
log4j.appender.FILE.layout=org.apache.log4j.PatternLayout
log4j.appender.FILE.layout.ConversionPattern=%d{MMM dd yyyy HH:mm:ss,SSS} [%t] %-5p %l - %m%n
log4j.appender.FILE.File=/var/log/myt.log
log4j.appender.FILE.DatePattern='.'yyyy-MM-dd
log4j.appender.FILE.MaxNumberOfDays=30
log4j.appender.FILE.CompressBackups=true

Wednesday, November 18, 2009

How to choose the right WiFi channel

If you setup your wireless access point, you may want to configure it in such a way minimizing interference in your neighborhood. I found this interesting post with some tips:


  • There must be a spacing of at least 5 channels (or more) between each WiFi network in order to avoid interferences. Two WiFi networks operating on the same channel are forced to share bandwidth, as they can't "talk" simultaneously, which halves each network's bandwidth. In order to evade this effect, you need to change your access point's channel, but taking the adjacent one won't do it, as WiFi channels are arranged in an overlapping pattern, as you can see in the scheme below. The default channel of most wifi devices is channel 6, so in many cases channel 11 or higher are a good choice. Using NetStumbler one can very easily see which channels is used for each access point.


  • If all your WiFi-devices support 802.11g (the 54 MBit/s WiFi-variant), you should set your router to 802.11g-only mode, as the 802.11b-compatibility impacts on bandwidth and range even among 802.11g-devices.

  • Another possible cause of low performance may be proprietary WiFi acceleration modes like "SuperG", "MAXg", "125 High Speed Mode" or "SpeedBooster", if not all devices in your network support the very same mode, why you should disable those.

  • Also note that a lot of cordless phones in NZ operate at the 2.4 GHz band like Wifi and so most of them cause interferences WiFi, that can't be avoided by a channel change, since those phones use a very broad spectrum or perform permanent frequency hopping.


    If you own a 2.4 GHz phone, try switching it off and removing the power supply of it's base station. In case your wireless signal improves, replace your cordless phone with a new one operating at 1.8 GHz or 5.8 GHz.

  • A cheap and easy solution to extend the coverage of your WiFi environment is to place a repeater at the correct location. It will repeat the wireless signal and extend the coverage (no cables needed), without creating a new network. Many very cheap (+-10euro) wifi access points (for example my DLink DWL-G700AP) can be configured to work as a repeater instead of the default access point functionality.

  • Transmit power: In most cases, the transmit power should be set to the highest value. This maximizes range, which reduces the number of access points and cost of the system. If you're trying to increase the capacity of the network by placing access points closer together, set the power to a lower value to decease overlap and potential interference. Lower power settings also limit the wireless signals from propagating outside the physically controlled area of the facility, which improves security.

  • Service Set IDentifier (SSID): The SSID defines the name of a WLAN that users associate with. By default, the SSID is set to a common value, such as tsunami for Cisco products. In order to improve security, you should change the SSID to a non-default value to minimize unauthorized users from associating with the access point. For even better security, some access points let you disable SSID broadcasting. This keeps most client device operating systems (e.g., Windows XP) from sniffing the SSID from access point beacons and automatically associating with the access point. Someone could, however, obtain the SSID using other sniffing tools that obtain the SSID from 802.11 frames when users first associate with the access point.

  • Data rate: Most access points allow you to identify acceptable data rates. By default, 802.11b access points operate at 1, 2, 5.5, and 11Mbps data rates, depending on the quality of the link between the client device and the access point. As the link quality deteriorates, the access point will automatically throttle down to lower data rates in an attempt to maintain a connection. You can, however, exclude specific data rates. For example, you may want communications only at 11Mbps or not at all. This could be necessary to support higher bandwidth applications.

  • Beacon interval: The beacon interval is the amount of time between access point beacon transmissions. The default value for this interval is generally 10ms, that is 10 beacons sent every second. This is sufficient to support the mobility speed of users within an office environment. You can increase the beacon interval and have lower overhead on the network, but then roaming will likely suffer. It's best to leave this setting alone.

  • Request-to-send / clear-to-send (RTS / CTS): The RTS / CTS function alleviates collisions due to hidden nodes, which is when multiple stations are within range of a common access point but out of range of each other. In most cases, it's best to disable RTS / CTS, but refer to a previous tutorial for cases where RTS / CTS may be beneficial and what threshold values to use.

  • Fragmentation: Fragmentation can help reduce the amount of data needing retransmission when collisions or radio frequency (RF) interference occurs. As with RTS/ CTS, refer to a previous tutorial for cases where fragmentation may be beneficial and applicable threshold values.


Wifi security


  • The impact on the performance by using WEP or WPA really depends on the router. Underpowered old routers don't like the encryption overhead and will slow down somewhat. It is expected to be about 10-15% for either WEP or WPA on older units. In many cases, it's also affected by the speed of the client computer, especially if the WPA encryption is done in driver. Fortunately, this hasn't been the case for many years. These days, there's hardly any slowdown of using WEP or WPA on the performance. However, there's a huge difference in security between WEP and WPA.

  • A nice overview on the weakest to the strongest wireless security capacity is:


    • Considered as not safe:


      • No Security

      • Switching Off SSID: same has No Security. SSID can be easily sniffed even if it is Off

      • MAC Filtering: only to be used if nothing else is available, MAC number can be easily Spoofed

      • WEP64: Easy to "Break" by knowledgeable people

      • WEP128: A little Harder, but still easy to "Break" by knowledgeable people


    • Considered as safe:


      • WPA-PSK: Very Hard to Break

      • WPA-AES: Not functionally Breakable

      • WPA2: Not functionally Breakable


  • If you use Windows XP bellow SP3 and did not updated it, you would have to download the WPA2 patch from Microsoft.

  • The documentation of your Wireless devices (Wireless Router, and Wireless Computer's Card) should state the type of security that is available with your Wireless hardware.

  • All devices MUST be set to the same security level using the same pass phrase. Therefore the security must be set according whatever is the best possible of one of the Wireless devices. I.e. even if most of your system might be capable to be configured to the max. with WPA2, but one device is only capable to be configured to max . of WEP, to whole system must be configured to WEP.

  • Even when using WPA2, one still has to be careful and never use the default WEP or WPA password and default SSID. Different applications exist to recover the default WEP/WPA password based on the SSID. For Alcatel / Thomson SpeedTouch router this online generator can be very easy to recover the default password based on the SSID.

Monday, November 16, 2009

Recovery tools boot USB stick


Based on Hiren's Boot CD 12 I created my personal Boot USB stick to be as complete as possible (containing more than 500 portable tools, 2,30GB). The original Hiren recovery CD contains many very useful tools to recover, tweak or patch pc's, divided into the following categories: Partition Tools, Backup Tools, Recovery Tools, Testing tools, RAM testing tools, Hard disk tools, System information tools, Master Boot Recovery tools, BIOS CMOS tools, Multimedia tools, Password tools, NTFS tools, Browser File manager tools, Other tools, Dos tools, Optimizers, Network tools, Process tools, Registry tools, Startup tools, Tweakers and Antivirus tools. A portable 'mini Windows XP' that can be run from the stick is available as well at boot time.


Many of the tools are available by booting up from the USB stick, but others need to be run into a Windows environment. These windows tools can be easily accessed by using the 'HBCDMenu.exe' tool which will be started when the cd or USB stick is started within a running Windows environment. Since the tools available within the 'HBCDMenu.exe' can be configured very easily using a 'HBCDMenu.csv' file, I created an Excel file to change the configuration an export to the csv file easier. Using this Excel it is much easier to move and rearrange the tools. Next I added all the tools I was still missing to make them available through the 'HBCDMenu.exe' tool. All tools are started using a DOS bat script and an UHARC archive. The archive is extracted in the PC's %temp% folder and started. All tools should be completely portable so no tool settings in the registry are kept after running them. I created a generic batch script to be able to run all tools in different modes: normal, just open a command window, just open an explorer windows, run the tool in Sandboxie, show online info on the tool, convert the tool into a zip file, force extraction of the uharc file. The mode is set by creating a specific file in the %temp% folder.


I keep all my personal files in a secured FreeOTFE file to make sure if I ever lose the stick no personal information can be discovered.


Besides the Hiren tools I also converted the latest BackTrack 4 bootable ISO to make it boot from a USB stick and added this into the Hiren boot screen menu. This live cd linux distribution is focused on penetration testing and perfect for quick and easy WEP cracking.


On the website of Hiren, a good explanation is provided by Hiren on how to easily convert the BootCD into a bootable USB stick using Grub4Dos. I used this 'menu.lst' as boot menu so it includes the launch of the BackTrack live environment and portable Mini Windows XP. Within an Windows environment, this 'autorun.inf' file is used to make it easier to start the 'autorun.exe' tool and other commonly used tools. To keep a backup of all my configuration, I configured a specific portable Dropbox so I can access all my tools online and keep them in sync on different locations.


The USB stick with all the extra tools requires now at least 2,29GB (I use it on a 8GB stick). I also added many of my extra tools into the CD iso file, but to keep it burnable onto a 80minute CD, some of the large tools didn't fit (office portable, tor browser, skype, toad, oracle client).


Compared to the original Hiren 10 boot cd, I've added different Windows tools. In the HBCDMenu cvs creator Excel, the complete list of all the tools are ordered in comprehensive categories. Many of these tools come from Sysinternals and Nirsoft since they provide some very useful portable little tools.


Update 25/11/2009: removed long list of personally added tools
Update 3/12/2010: update for Hiren Boot CD 12

Monday, October 26, 2009

Regular Expressions Regex

I mostly use RegexBuddy to create and test my regular expressions, but I just came across some nice free online tools RegExr , RexV, JavaScript Regex Generator and Nregex to create and test regular expressions. Also useful, a toolbox, RegExp Tools and some examples of some commonly required regular expressions...

Java regex tester

Friday, October 16, 2009

Dropbox - daily usage

Dropbox is a free online service to easily synchronize and backup your data. It can be very useful and it has some very nice features, but it has some limitations too.

Dropbox features:

  • 2GB free online storage, easy registration.
  • Easy sync to different computers / Macs.
  • Files are always reachable using the Dropbox website.
  • Dropbox keeps 30 days version and deleted files history.
  • A public folder with direct static file url's makes it possible to host your site on Dropbox server.
  • Sharing of folders between Dropbox accounts is possible.

Dropbox limitation:

  • No filtering on files / folders is possible.
  • For each account, one folder is synchronized. You need to use Junctions (hardlink NTFS shortcuts (easy Junction explorer extention)) if you want to include external folders in the sync.
  • No default support for multiple account synchronization. You need to use the portable Dropbox (see information below) if you want to synchronize multiple accounts from the same computer at the same time.
  • No option to make Dropbox always request for account password on startup (would be useful for the portable version).

Personal usage scenario's:

  • Synchronization of my AI Roboform data so I have all my login's everywhere. I combine this with the Roboform2go on my USB stick and Dropbox portable to make sure everything is kept in sync.
  • Hosting of files for websites. Instead of having to upload them to different free hosts with ads, I can now use the Dropbox space for easy hosting. Even complete websites are usable when hosted within the 'public' folder of a Dropbox account.
  • Combination of FreeOTFE portable to make sure my USB stick portable Dropbox account is kept save. I place all Dropbox files within a FreeOTFE secured file, since else when losing USB stick, anyone could have access to my Dropbox account by just starting up the portable Dropbox application.
  • Some other tips and tricks for Dropbox usage from LifeHacker. The 'start torrent from anywhere' trick is nice!
  • Since I use my personal SVN I wanted to make a combination of the automatic Dropbox synchronization coupled to the full control SVN synchronization for development projects. By using the Junctions I could link the SVN folders into Dropbox. Now I have an auto sync of files and folders, but I can manually sync with SVN to have an extra backup and history tracking with full control. The downside of this is that all hidden '.svn' folders are kept in sync too within Dropbox and this can take a lot of your Dropbox space. With the selective sync option in Dropbox, you can disable the syncronisation of the .svn folders to save space. But be carefull, when deselecting .svn folders in the Dropbox configuration, it will remove those folders from your local system. So it’s best to first create some dummy empty .svn folders, next disable the sync of these folders and then copy the real .svn folder at the correct location.

Dropbox Portable installation:

DropboxPortableAHK is now available. This makes the use of Dropbox Portable much easier. All download/configuration is now automated and very userfriendly. Just download from the developer website: http://nionsoftware.com/dbpahk/overview

Update 09/01/2011: New version of the Dropbox Portable framework (5.3.4). But this new framework requires a relink! The new version has easier update (just copy official Dropbox setup file in the update folder). Cleanup of blog and added extra info on installation.

Update 20/01/2011: added info from comments to change path in config.db

Update 03/04/2011: link to new DropboPortableAHK version, no more manual tweaks required.

Sunday, October 11, 2009

Keep your batteries in good shape

I red a good article on how to keep your batteries in good shape: Dutch, Babelfish translated English version

Top tips:

  • Make sure to recharge long enough before first usage

  • Always use the original or exactly matching charger

  • Nickel Cadmium (NiCd) batteries should be completely empty before recharging (a battery memory effect will shorten the battery live)
    • These batteries are most often used as AAA or AA rechargeable batteries or older mobile phones

  • Lithium Ion batteries should never be completely empty before recharging (no battery memory, but very sensitive to higher temperatures while charging)
    • These batteries are most often used in mobile phones, pda's and notebooks

  • It can help to put your batteries in a cool environment when you won't use them for some time.

Thursday, October 1, 2009

Folder structure creator - Excel VBS

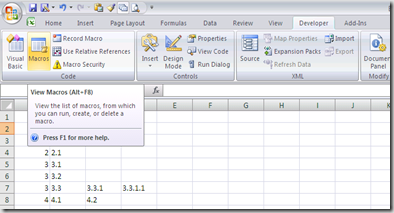
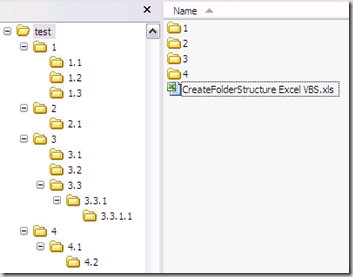
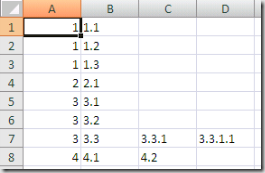
If you need to create a lot of folders and subfolders, Excel_2007.jpgwith some specific structure, it can be usefull if you can use the power of Excel to make up your folder names and structure. All kind of easy and quick formulas can be used, and once the strucuture is set up, you can easily create the empty folder structure with just one click by using this little VBS macro. The base folder used will depend on the location of the Excel file, so make sure it's saved or copied in the correct folder.
Sub CreateFolderStructure()
'Create folder for all vlues in current sheet
'folders will be created in folder where the excel file was saved
'folders will be created from first row, first column, until empty row is found
'Example expected cell structure: (data starting in current sheet, column A, row 1)
'folder1 subfolder1 subsubfolder1
'folder2
'folder3 subfolder3
'...
'this will result in:
'\folder1\subfolder1\subsubfolder1
'\folder2
'\folder3\subfolder3
'...
Set fs = CreateObject("Scripting.FileSystemObject")
For iRow = 1 To 65000
pathToCreate = ActiveWorkbook.Path
For iColumn = 1 To 65000
currValue = Worksheets(ActiveCell.Worksheet.Name).Cells(iRow, iColumn).Value
If (currValue = "") Then
Exit For
Else
pathToCreate = pathToCreate & "\" & CStr(currValue)
'MsgBox (pathToCreate)
folderToCreate = pathToCreate
If Not (fs.FolderExists(folderToCreate)) Then
fs.CreateFolder (folderToCreate)
End If
End If
Next
Next
End Sub


The Excel sheet with the macro can be downloaded here. Before running the macro make sure the rows and columns of the active sheet are filled in correctly. Next simply run the macro by using the button. foldercreatorexcel1foldercreatorexcel2 foldercreatorexcel3foldercreatorexcel4

If you created to many empty folders by accident, you can easily remove them again using this little tool: Remove Empty Directories


Update 13/11/2009: Modified the Excel VBS script to let you navigate to the desired base folder upon launching the macro, so the Excel file may now be saved at any location, the base folder will have to be specified upon launching the macro.


Update 21/04/2012: Someone commented the VBS code is not working correctly when using some special characters. This is because some characters are not supported by Windows to be used in a file or folder name.


FolderChar


I updated the VBS code in the Excel sheet to make sure these special characters are removed before trying to create the folders.


The Excel sheet is updated, also an Excel template is available.


An example with special characters and the resulting folders created:


FolderSpecialCharsExample


The new VBS code used is:


Sub CreateFolderStructure()
'Create folder for all vlues in current sheet
'folders will be created in folder where the excel file was saved
'folders will be created from first row, first column, until empty row is found
'Example expected cell structure: (data starting in current sheet, column A, row 1)
'folder1    subfolder1  subsubfolder1
'folder2
'folder3    subfolder3
'           subfolder4
'...
'this will result in:
'\folder1\subfolder1\subsubfolder1
'\folder2
'\folder3\subfolder3
'\folder3\subfolder4
'...
    baseFolder = BrowseForFolder
    If (baseFolder = False) Then
        Exit Sub
    End If
    Set fs = CreateObject("Scripting.FileSystemObject")
    For iRow = 2 To 6500
        pathToCreate = baseFolder
        leafFound = False
        For iColumn = 1 To 6500
            currValue = Trim(Replace(Replace(Replace(Replace(Replace(Replace(Replace(Worksheets(ActiveCell.Worksheet.Name).Cells(iRow, iColumn).Value, ":", ""), "*", ""), "?", ""), Chr(34), ""), "<", ""), ">", ""), "|", ""))
            If (currValue = "" And leafFound) Then
                Exit For
            ElseIf (currValue = "") Then
                parentFolder = FindParentFolder(iRow, iColumn)
                parentFolder = Replace(Replace(Replace(Replace(Replace(Replace(Replace(parentFolder, ":", ""), "*", ""), "?", ""), Chr(34), ""), "<", ""), ">", ""), "|", "")
                If (parentFolder = False) Then
                    Exit For
                Else
                    pathToCreate = pathToCreate & "\" & parentFolder
                    If Not (fs.FolderExists(pathToCreate)) Then
                        CreateDirs (pathToCreate)
                    End If
                End If
            Else
                leafFound = True
                pathToCreate = pathToCreate & "\" & currValue
                If Not (fs.FolderExists(pathToCreate)) Then
                    CreateDirs (pathToCreate)
                End If
            End If
        Next
        If (leafFound = False) Then
            Exit For
        End If
    Next
End Sub

Function FindParentFolder(row, column)
    For iRow = row To 0 Step -1
        currValue = Worksheets(ActiveCell.Worksheet.Name).Cells(iRow, column).Value
        If (currValue <> "") Then
            FindParentFolder = CStr(currValue)
            Exit Function
        ElseIf (column <> 1) Then
            leftValue = Worksheets(ActiveCell.Worksheet.Name).Cells(iRow, column - 1).Value
            If (leftValue <> "") Then
                FindParentFolder = False
                Exit Function
            End If
        End If
    Next
End Function


Function BrowseForFolder(Optional OpenAt As Variant) As Variant
     'Function purpose:  To Browser for a user selected folder.
     'If the "OpenAt" path is provided, open the browser at that directory
     'NOTE:  If invalid, it will open at the Desktop level
     
    Dim ShellApp As Object
     
     'Create a file browser window at the default folder
    Set ShellApp = CreateObject("Shell.Application"). _
    BrowseForFolder(0, "Please choose a folder", 0, OpenAt)
     'Set the folder to that selected.  (On error in case cancelled)
    On Error Resume Next
    BrowseForFolder = ShellApp.self.Path
    On Error GoTo 0
     
     'Destroy the Shell Application
    Set ShellApp = Nothing
     
     'Check for invalid or non-entries and send to the Invalid error
     'handler if found
     'Valid selections can begin L: (where L is a letter) or
     '\\ (as in \\servername\sharename.  All others are invalid
    Select Case Mid(BrowseForFolder, 2, 1)
    Case Is = ":"
        If Left(BrowseForFolder, 1) = ":" Then GoTo Invalid
    Case Is = "\"
        If Not Left(BrowseForFolder, 1) = "\" Then GoTo Invalid
    Case Else
        GoTo Invalid
    End Select
     
    Exit Function
     
Invalid:
     'If it was determined that the selection was invalid, set to False
    BrowseForFolder = False
     
End Function

Sub CreateDirs(MyDirName)
' This subroutine creates multiple folders like CMD.EXE's internal MD command.
' By default VBScript can only create one level of folders at a time (blows
' up otherwise!).
'
' Argument:
' MyDirName   [string]   folder(s) to be created, single or
'                        multi level, absolute or relative,
'                        "d:\folder\subfolder" format or UNC
'
' Written by Todd Reeves
' Modified by Rob van der Woude
' http://www.robvanderwoude.com

    Dim arrDirs, i, idxFirst, objFSO, strDir, strDirBuild

    ' Create a file system object
    Set objFSO = CreateObject("Scripting.FileSystemObject")

    ' Convert relative to absolute path
    strDir = objFSO.GetAbsolutePathName(MyDirName)

    ' Split a multi level path in its "components"
    arrDirs = Split(strDir, "\")

    ' Check if the absolute path is UNC or not
    If Left(strDir, 2) = "\\" Then
        strDirBuild = "\\" & arrDirs(2) & "\" & arrDirs(3) & "\"
        idxFirst = 4
    Else
        strDirBuild = arrDirs(0) & "\"
        idxFirst = 1
    End If

    ' Check each (sub)folder and create it if it doesn't exist
    For i = idxFirst To UBound(arrDirs)
        strDirBuild = objFSO.BuildPath(strDirBuild, arrDirs(i))
        If Not objFSO.FolderExists(strDirBuild) Then
            objFSO.CreateFolder strDirBuild
        End If
    Next

    ' Release the file system object
    Set objFSO = Nothing
End Sub


11/10/2012: I updated the VBS code in the Excel sheet to make sure these special characters are removed before trying to create the folders. Extra input information and validation is added to make sure invalid characters can not be used. The Excel sheet is updated


08/08/2013: Updated sheets, added a trim to remove spaces at begin and end of cell value, since this could result in macro exception (see comments)


17/02/2014: I’ve extended this workbook with a new sheet in which the nested folder structure of the filesystem can be imported. Each folder name will be stored in a separate cell respecting the nested structure


The new VBS code is:


Sub ImportFolderStructure()
'Import folder structure starting from selected base folder
'each subfolder will be stored in a separete cell
'eg:
'Folder 1|Subfolder1|SubSubfolder1
'Folder 2|Subfolder2
'Folder 3|Subfolder3|SubSubfolder3
'...
    Application.ScreenUpdating = False
    baseFolder = BrowseForFolder
    If (baseFolder = False) Then
        Exit Sub
    End If
    Application.StatusBar = "Folder structure below " & baseFolder & " will be stored in the sheet " & ActiveCell.Worksheet.Name
    StoreSubFolder baseFolder, 1, 0
    Application.StatusBar = "Folder structure below " & baseFolder & " has been stored in the sheet " & ActiveCell.Worksheet.Name
    Range("A2").Select
    Application.ScreenUpdating = True
End Sub

Sub StoreSubFolder(baseFolderObj, ByRef iRow, ByVal iColumn)
    Set fs = CreateObject("Scripting.FileSystemObject")
    Set folderBase = fs.GetFolder(baseFolderObj)
    Set folderBaseSubs = folderBase.SubFolders
    iRow = iRow + 1
    iColumn = iColumn + 1
    For Each subFolder In folderBaseSubs
        Worksheets(ActiveCell.Worksheet.Name).Cells(iRow, iColumn).Value = subFolder.Name
        StoreSubFolder subFolder, iRow, iColumn
    Next
End Sub

Sub ClearImportData()
    Application.ScreenUpdating = False
    Range("A2").Select
    Range(Selection, ActiveCell.SpecialCells(xlLastCell)).Select
    Selection.ClearContents
    Range("A2").Select
    Application.ScreenUpdating = True
End Sub

Sub CreateFolderStructure()
'Create folder for all vlues in current sheet
'folders will be created in folder where the excel file was saved
'folders will be created from first row, first column, until empty row is found
'Example expected cell structure: (data starting in current sheet, column A, row 1)
'folder1    subfolder1  subsubfolder1
'folder2
'folder3    subfolder3
'           subfolder4
'...
'this will result in:
'<currentpath>\folder1\subfolder1\subsubfolder1
'<currentpath>\folder2
'<currentpath>\folder3\subfolder3
'<currentpath>\folder3\subfolder4
'...
    baseFolder = BrowseForFolder
    If (baseFolder = False) Then
        Exit Sub
    End If
    Set fs = CreateObject("Scripting.FileSystemObject")
    For iRow = 2 To 6500
        pathToCreate = baseFolder
        leafFound = False
        For iColumn = 1 To 6500
            currValue = Trim(Replace(Replace(Replace(Replace(Replace(Replace(Replace(Replace(Replace(Worksheets(ActiveCell.Worksheet.Name).Cells(iRow, iColumn).Value, ":", "-"), "*", "-"), "?", "-"), Chr(34), "-"), "<", "-"), ">", "-"), "|", "-"), "/", "-"), "\", "-"))
            Worksheets(ActiveCell.Worksheet.Name).Cells(iRow, iColumn).Value = currValue
            If (currValue = "" And leafFound) Then
                Exit For
            ElseIf (currValue = "") Then
                parentFolder = FindParentFolder(iRow, iColumn)
                If (parentFolder = False) Then
                    Exit For
                Else
                    pathToCreate = pathToCreate & "\" & parentFolder
                    If Not (fs.FolderExists(pathToCreate)) Then
                        CreateDirs (pathToCreate)
                    End If
                End If
            Else
                leafFound = True
                pathToCreate = pathToCreate & "\" & currValue
                If Not (fs.FolderExists(pathToCreate)) Then
                    CreateDirs (pathToCreate)
                End If
            End If
        Next
        If (leafFound = False) Then
            Exit For
        End If
    Next
End Sub

Function FindParentFolder(row, column)
    For iRow = row To 0 Step -1
        currValue = Worksheets(ActiveCell.Worksheet.Name).Cells(iRow, column).Value
        If (currValue <> "") Then
            FindParentFolder = CStr(currValue)
            Exit Function
        ElseIf (column <> 1) Then
            leftValue = Worksheets(ActiveCell.Worksheet.Name).Cells(iRow, column - 1).Value
            If (leftValue <> "") Then
                FindParentFolder = False
                Exit Function
            End If
        End If
    Next
End Function

Function BrowseForFolder(Optional OpenAt As Variant) As Variant
     'Function purpose:  To Browser for a user selected folder.
     'If the "OpenAt" path is provided, open the browser at that directory
     'NOTE:  If invalid, it will open at the Desktop level
     
    Dim ShellApp As Object
     
     'Create a file browser window at the default folder
    Set ShellApp = CreateObject("Shell.Application"). _
    BrowseForFolder(0, "Please choose a folder", 0, OpenAt)
     'Set the folder to that selected.  (On error in case cancelled)
    On Error Resume Next
    BrowseForFolder = ShellApp.self.Path
    On Error GoTo 0
     
     'Destroy the Shell Application
    Set ShellApp = Nothing
     
     'Check for invalid or non-entries and send to the Invalid error
     'handler if found
     'Valid selections can begin L: (where L is a letter) or
     '\\ (as in \\servername\sharename.  All others are invalid
    Select Case Mid(BrowseForFolder, 2, 1)
    Case Is = ":"
        If Left(BrowseForFolder, 1) = ":" Then GoTo Invalid
    Case Is = "\"
        If Not Left(BrowseForFolder, 1) = "\" Then GoTo Invalid
    Case Else
        GoTo Invalid
    End Select
     
    Exit Function
     
Invalid:
     'If it was determined that the selection was invalid, set to False
    BrowseForFolder = False
     
End Function

Sub CreateDirs(MyDirName)
' This subroutine creates multiple folders like CMD.EXE's internal MD command.
' By default VBScript can only create one level of folders at a time (blows
' up otherwise!).
'
' Argument:
' MyDirName   [string]   folder(s) to be created, single or
'                        multi level, absolute or relative,
'                        "d:\folder\subfolder" format or UNC
'
' Written by Todd Reeves
' Modified by Rob van der Woude
' http://www.robvanderwoude.com

    Dim arrDirs, i, idxFirst, objFSO, strDir, strDirBuild
    ' Create a file system object
    Set objFSO = CreateObject("Scripting.FileSystemObject")
    ' Convert relative to absolute path
    strDir = objFSO.GetAbsolutePathName(MyDirName)
    ' Split a multi level path in its "components"
    arrDirs = Split(strDir, "\")
    ' Check if the absolute path is UNC or not
    If Left(strDir, 2) = "\\" Then
        strDirBuild = "\\" & arrDirs(2) & "\" & arrDirs(3) & "\"
        idxFirst = 4
    Else
        strDirBuild = arrDirs(0) & "\"
        idxFirst = 1
    End If

    ' Check each (sub)folder and create it if it doesn't exist
    For i = idxFirst To UBound(arrDirs)
        strDirBuild = objFSO.BuildPath(strDirBuild, arrDirs(i))
        If Not objFSO.FolderExists(strDirBuild) Then
            objFSO.CreateFolder strDirBuild
        End If
    Next

    ' Release the file system object
    Set objFSO = Nothing
End Sub


The Excel file can be downloaded as XLS (template for easy reuse). My Excel sheet with combined macro’s has been updated as well, see this blog post.


Update 27/05/2014: cleanup of the cell types (some cell were saved as type ‘Scientific’ resulting in some strange representation after import of folders named with numbers, Thanks to Jean for reporting)

Wednesday, September 16, 2009

Mouse rocker gestures

Mouse Rocker
Based on the AutoHotKey script from Adam Pash on the Lifehacker site, I made my own version to fit my personal mouse rocker gesture needs.

Basically, a mouse rocker gesture requires that you press one mouse button, hold it down, then press the other. You can rock across the mouse from right-to-left or left-to-right; each direction you rock gives you a different result. Once you get used to this gesture, the name makes perfect sense, and you'll wonder why you weren't mouse rocking your whole life.


I changed the way the script is configured so one can now easily add process names in the rocker.ini file to change the behaviour for a specific application. And I added extra navigation combinations so one should be able to easily make it fit his own needs.
For example in excel you can now easily switch to the next or previous tabbed sheet using mouse rocker gestures. UltraEdit switching between open files is also supported by sending 'Alt + up' or 'Alt + down' keys with the mouse rocker gestures. On first run, it will now also ask if you want to start the tool automatically during windows start. The ini file is created on first run in the directory from where the rocker.exe file is launched. The different groups denote the keys that will be send when a mouse rocker gesture is detected, one can easily add or remove any process name to change the behaviour in a specific application.
[Preferences]
CtrlGroup=itunes.exe
CtrlTabGroup=notepad++.exe,dreamweaver.exe,pidgin.exe
CtrlUpDnGroup=empty
CtrlPgUpDnGroup=excel.exe
AltGroup=firefox.exe,iexplore.exe,opera.exe,feeddemon.exe,explorer.exe
AltUpDnGroup=uedit32.exe
AltPgUpDnGroup=empty
BckspGroup=empty
IgnoreGroup=empty
Startup=1
UpdateCheck=0
Version=0.3


No installation is required, just download the zip file, extract and run the exe. The AutoHotKey source script is included in the zip file.

Update 19/02/2011: links updated

Update 20/12/2017: links updated

Hibernate subquery join using Criteria

hibernate
I recently needed to create max query in hibernate returning an object instead of the maximal value of the field and I wanted to do this using Hibernate Criteria in our JPA environment.
A simple example of what I wanted:
select *
from user
where userid = (select max(userid)
                from user
                where company = 'aCompanyName')

The way to program this in JPA/Hibernate using Criterias, DetachedCriteria and Subqueries. Make sure to use Subqueries.propertyEq instead of Subqueries.eq if you want to join on a field:

public User getMaxUserOfCompany(String companyName) {
Session session = (Session) em.getDelegate();
DetachedCriteria subCriteria = DetachedCriteria.forClass(User.class);
subCriteria.add(Restrictions.eq("company", companyName));
subCriteria.setProjection(Projections.max("userid") );
Criteria criteria = session.createCriteria(User.class);
criteria.add(Subqueries.propertyEq("userid", subCriteria));
return (User) criteria.uniqueResult();
}

Thursday, July 2, 2009

SpeedTouch ADSL router patch

Below is shown how to flash a SpeedTouch router with a new firmware when the administrator password is not known, and then patch the SpeedTouch 716v5 router to disable the ADSL modem and use it as a standard 3-port lan router, 1 port will be used for incoming internet (wan). The configuration was provided by Thomson.


Recently we had to leave Tele2 with theire very nice unlimited offering. We joined Telenet because we coulnd't connect but through a coax cable in our new house.


For Tele2, we had to buy a ADSL modem + router, the Thomson Alcatel SpeedTouch 716v5. It's a very nice router with Wifi and VOIP integrated. Since this router was still working fine, I didn't want to throw it away. But the problem is that Tele2 puts an administrator password on it, and they didn't want to remove the password or provide it to me. To flash a new rom on the router, you also need to have the administrator password.


I was able to find a method to flash a new rom on the router without having the administrator rights. I flashed this (afterwards I used 6.2.29.2) rom onto it:


-connect your computer with a lan cable to the SpeedTouch router


-assign a static ip to your network card, you can just copy the settings you got when you received an IP from the DHCP


-start the flashing by executing the upgrade file


-when the upgrade requests for the router password, use a small screwdriver to push the reset button and keep this reset button pressed. In the meantime power off the SpeedTouch and power it on again. Keep on pressing the reset button and wait for 10 - 15 seconds. The power led will blink red, now you can release the reset button.


-Quickly press back on the upgrade flasher, the software will search again for the SpeedTouch device and continue the upgrade without requesting the administrator password.


I had to do it over some times before all went right, but at the end I managed to flash the default SpeedTouch716v5 rom v 6.1.7.2 and afterwards v6.2.29.2


Once the default rom is installed, you will have Administrator rights by logging in using: username Administrator and emtpy password.


Next, I configured the router to not use ADSL modem anymore, but use the 4th lan port as incoming internet connection and distribute the internet over Wifi and the remaining 3 lan ports with the build in DHCP server. The commands must be put in using telnet: Start -> Run -> cmd -> telnet, login with user Administrator and password (empty by default).


:ppp relay flush
:ppp flush
:eth flush
:atm flush
:atm phonebook flush
:eth bridge ifdelete intf=ethport4
:eth ifadd intf=eth_wan
:eth ifconfig intf=eth_wan dest=ethif4
:eth ifattach intf=eth_wan
:ip ifadd intf=ip_wan_eth dest=eth_wan
:ip ifconfig intf=ip_wan_eth status=up
:ip ifattach intf=ip_wan_eth
:nat ifconfig intf=ip_wan_eth translation=enabled
:dhcp client ifadd intf=ip_wan_eth
:dhcp client ifconfig intf=ip_wan_eth metric=5 dnsmetric=5
:dhcp client rqoptions add intf=ip_wan_eth option=dhcp-lease-time
:dhcp client rqoptions add intf=ip_wan_eth option=dhcp-renewal-time
:dhcp client rqoptions add intf=ip_wan_eth option=dhcp-rebinding-time
:dhcp client rqoptions add intf=ip_wan_eth option=subnet-mask
:dhcp client rqoptions add intf=ip_wan_eth option=classless-static-routes
:dhcp client rqoptions add intf=ip_wan_eth option=default-routers
:dhcp client rqoptions add intf=ip_wan_eth option=classfull-static-routes
:dhcp client rqoptions add intf=ip_wan_eth option=domain-name-servers
:dhcp client ifattach intf=ip_wan_eth
:saveall


You can now connect your incoming internet connection on LAN port 4 and the internet will be distributed over the other LAN ports and Wifi. I tested this method with rom version 6.2. But then the internet was only distributed over the 3 remaining LAN ports, and not over the WIFI connections.
Update 18/04/2010: working with 6.2.29.2.


Finaly, I configured VOIP. I find out Weepee was very cheap and working very well so far. They have a very fast email support. To get a Weepee fixed line telephone number it costs 9 euros. One time fee! You can chose to receive a new number or transfer your existing fixed number, either way it will cost only 9euros. After this one time cost, you only have to pay for the calls you make, and the rates are very competitive.


To configure Weepee VOIP on my SpeedTouch, I used these VOIP settings:


SIP URI: SIP username provided by Weepee (12 numbers, starting with 32)


Username: SIP username provided by Weepee (12 numbers, starting with 32)


Password: SIP password provided by Weepee


Displayname: SIP username provided by Weepee


Abbreviated number: SIP username provided by Weepee


Port: Phone 1


Expert VOIP configuration:


Registrar: SIP server provided by Weepee, ssw7.weepee.org


Registrar Port: 5060


Proxy: SIP server provided by Weepee, ssw7.weepee.org


Proxy prot: 5060


Expire time: 3600


That should do the trick. I hope someone else can benefit from it.


Update: 8/11/2009


WeePee now has native support for Skype over VOIP. You can be called and make calls for free over Skype. To make it work you'll need to follow these steps:


- Login into WeePee client configuration panel: https://ssl.weepee.org/klanten/flash


- Go to 'Information' -> 'Skype'. As mentioned on this page, you need a Skype Business Account. You'll need to create a new account through the Skype Business Account User management panel using the Skype button 'Create a business account'. (It doesn't work by registering an existing account into Skype Business)


- When the Skype business account is created, you'll need to login once using Skype normally. This way, you'll be able to add your contacts into this account too.


- Now you can provided the Skype username and password of the Skype Business Account into WeePee client configuration panel. Click on the 'Create' button to connect Skype into Weepee. Your status should change to 'Online'.


- To make calls over Skype through WeePee, click on the tab menu 'Short numbers' within the WeePee client configuration panel. For each of your Skype contacts, add a shortcode by adding the 'skype#<skypeusername>' for each shortcode. No you can call your Skype contacts by calling for example '25' from your phone.


Update 09/04/2010: new link for speedtouch rom

Update 18/04/2010: new rom version 6.2.29.2 which works with the specific lan configuration