Showing posts with label usb. Show all posts

Wednesday, December 18, 2013

iTop running on Windows portable PHP/MySQL MoWeS

Based on my previous topic informing about the nice functionalities of MoWeS to get easily and quickly a PHP/MySQL environment, I did set up an iTop environment in order to discover and play with the CMDB/ITIL ticketing service desk tool.

While doing so, I also discovered the MoWeS Mixer is not available any longer. Apparently the company Chsoftware behind this tools has stopped in 2012. But the MoWeS tool still works very well on Windows 7 x64 and new packages can easily be added by updating the mowes.ini and packages.ini files manually.

In order to get iTop running, some other parameters had to be updated as well: extra memory allocation is to be allowed in php.ini by changing the memory_limit from 32M to 64M. The php_soap.dll extension needs to be loaded as well by uncommenting it in the php.ini file. For mysql, the allowed packets needed to be extended by adding a parameter max_allowed_packet=500M within the [mysqld] section of the my.ini file.

I’ve created an archive containing a clean MoWeS environment with clean iTop. The iTop still needs to be configured using the web wizard upon first connection to the iTop site (localhost/itop) (mysql username: root, password: <empty>. I’ve also a MoWeS environment with base demo iTop installed (itop username: admin, password: itop).

Wednesday, November 24, 2010

MoWes Portable + OS Commerce 2.2 / 3.0a

I wanted to play with OS Commerce. Since this is written in PHP I needed some portable PHP, Apache and MySQL package. MoWes Portable does exactly what I was looking for and they offer some very nice online MoWes Mixer so anyone can easily create it’s own portable package (choice in version, packages, etc.). I created my own package with OSCommerce v2.2, v3.0a and phpMyAdmin. I added extra languages and applied some standard configuration/tweaks to make it immediately usable in Belgium.

Full package download containing MoWes Portable 2, Apache2_SE, MySQL5_SE, PHP52, MediaWiki, OpenDB, OS_Commerce 2.2, OS_Commerce 3.0a, phpBB3 and PHPMyAdmin.

VirtueMartVirtueMart is a similar open source project, but build within Joomla!. For me they seem very similar in the provided functionality. Joomla and thus VirtueMart can be integrated within MoWes as well using the MoWes mixer.

InstantRails + Redmine

I just discovered Redmine, and it looks quite promising to me as a project development tracking system.

InstantRails

Since I’m a big fan of portable applications, I tried to play with Redmine using InstantRails, but had some trouble getting it to run, since InstantRails uses some old versions of some required gems. So after upgrading gems to 1.3.7 and rack to 1.0.1 and finding some old version of the MySQL lib libmysql.dll v5.0 I got it all working nicely locally and portable. If anyone would like to play with it: download InstantRails 2.0 + Redmine 1.1.1 (42MB). I removed some parts of the gems documentation files to make it smaller.

The InstantRails package contains MySQL, Apache, Ruby and Rails. To use it, just run ‘InstantRails.exe’, the Apache and MySQL servers will automatically be launched.

 InstantRails

During startup, InstantRails may request to regenerate the configuration because of a folder location change. Just press ‘Yes’. If Apache doesn’t start automatically, make sure the ‘apache\logs’ folder exists.

Next click on the ‘i’ button, in the menu chose ‘Rails Applications’ –> ‘Manage Rails Applications’, select ‘Redmine’ push the button ‘Start with Mongrel’.

ManageRailsApplications

StartMongrel

A command window will open up and when it’s loaded you can navigate to http://localhost:3003 and start using your own personal portable Redmine. (default login: admin, password: admin). To manage the database, phpMyAdmin is included as well, just navigate to http://localhost/mysql.

If you don’t care to have it portable, you could as well install Ruby on Rails and Redmine using this 1 minute guide.

Plugins

Redmine 2 is included, but I added the following plugins I found interesting as well:

  • Codereview: code review comments can be added in repository within Redmine. It has a project tab with an overview of the code review comments as well
  • Hudson: project tab for Hudson administration
  • Issue due date: automatically set issue due date to the version due date
  • Timesheet: create a timesheet with overview of tracked timings
  • Time Tracker: easily track timings while working on issues
  • Wiki notes: extra wiki options, example created
  • Wiki tabs: possibility to add a project tab linked to wiki page, not configured yet
  • Tab: custom project tab configuration, configured to get the Sonar project information page

Demo

Within Redmine I configured roles, issues states, permissions and a workflow. I set up different users, projects and issues to be able to play with different configuration settings. Each user is configured to use the same password as the username: admin, teamleader, developer, etc. (see administration console). It is very easy to configure which role can perform what tasks and see specific content within Redmine.

Administration

Creation and management of issues is straightforward. It has a good integration of time tracking, at every update of an issue, the user can immediately update the time tracks.

UpdateIssue

With the time tracker plugin, it is even easier to track your timings. With an issues selected, you can easily let Redmine keep track of the time you spend on that issue by using the start/stop links at the top.

TimeTracker

Reporting

An important part of an issue tracking system is the reporting capabilities.

A summary with the number of issue in open or closed state can be seen:

Summary

In the list of issues, filters can quickly be added and columns can be chosen:

IssuesFilter

In the roadmap overview, all versions / planned version of the project are listed with an overview of their related issues:

Roadmap

The activity overview shows the activities performed within a project.

Activity

The spent time within a project can be viewed in an overview:

SpentTime

But custom reports can be created on the fly as well:
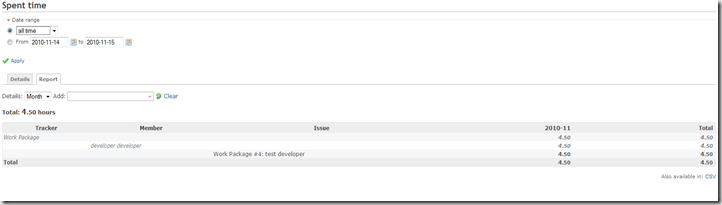
SpentTimeCustomReport

SpentTimeCustomReportFilters

With the Timesheet plugin, an overview of all projects, all users, etc. of the spent time can be generated easily on the fly:

Timesheet

Integration

Specific plugins exist to integrate the Redmine issue lists with TortoiseSVN and TortoiseGIT: Tortoise Redmine Plugin.

For full integration, follow this manual for the BugTraq properties configuration.

TortoiseIntegration

Points of improvement

One thing I noticed during my tests: if an issues is updated and a user changes the state of the issue, he still can select any user to assign it to. In my opinion, only users able to make changes on the selected target state of the issue, should appear in the list of users to assign the issue to. An issue tracking system should enforce all constraints of the workflow to make sure an issue can’t come in an invalid workflow state (eg. assigned user can not change the status). But this problem occurs on most tracking systems I checked (Track+, Jira, etc.). See this feature request, I checked the plugin development, but so far I couldn’t make it work myself yet.

Update 31/01/2011: InstantRedmine package updated to Redmin 1.1.1

Monday, November 16, 2009

Recovery tools boot USB stick


Based on Hiren's Boot CD 12 I created my personal Boot USB stick to be as complete as possible (containing more than 500 portable tools, 2,30GB). The original Hiren recovery CD contains many very useful tools to recover, tweak or patch pc's, divided into the following categories: Partition Tools, Backup Tools, Recovery Tools, Testing tools, RAM testing tools, Hard disk tools, System information tools, Master Boot Recovery tools, BIOS CMOS tools, Multimedia tools, Password tools, NTFS tools, Browser File manager tools, Other tools, Dos tools, Optimizers, Network tools, Process tools, Registry tools, Startup tools, Tweakers and Antivirus tools. A portable 'mini Windows XP' that can be run from the stick is available as well at boot time.


Many of the tools are available by booting up from the USB stick, but others need to be run into a Windows environment. These windows tools can be easily accessed by using the 'HBCDMenu.exe' tool which will be started when the cd or USB stick is started within a running Windows environment. Since the tools available within the 'HBCDMenu.exe' can be configured very easily using a 'HBCDMenu.csv' file, I created an Excel file to change the configuration an export to the csv file easier. Using this Excel it is much easier to move and rearrange the tools. Next I added all the tools I was still missing to make them available through the 'HBCDMenu.exe' tool. All tools are started using a DOS bat script and an UHARC archive. The archive is extracted in the PC's %temp% folder and started. All tools should be completely portable so no tool settings in the registry are kept after running them. I created a generic batch script to be able to run all tools in different modes: normal, just open a command window, just open an explorer windows, run the tool in Sandboxie, show online info on the tool, convert the tool into a zip file, force extraction of the uharc file. The mode is set by creating a specific file in the %temp% folder.


I keep all my personal files in a secured FreeOTFE file to make sure if I ever lose the stick no personal information can be discovered.


Besides the Hiren tools I also converted the latest BackTrack 4 bootable ISO to make it boot from a USB stick and added this into the Hiren boot screen menu. This live cd linux distribution is focused on penetration testing and perfect for quick and easy WEP cracking.


On the website of Hiren, a good explanation is provided by Hiren on how to easily convert the BootCD into a bootable USB stick using Grub4Dos. I used this 'menu.lst' as boot menu so it includes the launch of the BackTrack live environment and portable Mini Windows XP. Within an Windows environment, this 'autorun.inf' file is used to make it easier to start the 'autorun.exe' tool and other commonly used tools. To keep a backup of all my configuration, I configured a specific portable Dropbox so I can access all my tools online and keep them in sync on different locations.


The USB stick with all the extra tools requires now at least 2,29GB (I use it on a 8GB stick). I also added many of my extra tools into the CD iso file, but to keep it burnable onto a 80minute CD, some of the large tools didn't fit (office portable, tor browser, skype, toad, oracle client).


Compared to the original Hiren 10 boot cd, I've added different Windows tools. In the HBCDMenu cvs creator Excel, the complete list of all the tools are ordered in comprehensive categories. Many of these tools come from Sysinternals and Nirsoft since they provide some very useful portable little tools.


Update 25/11/2009: removed long list of personally added tools
Update 3/12/2010: update for Hiren Boot CD 12

Monday, February 23, 2009

Install Windows without disk drive


I've been searching for a long time to find an easy way to install Windows, only by booting from an USB-stick: no disk drive, no floppy disk, no pre-installed version of any OS required. Many resources talk about this on the net, but only one could do everything I needed and is really very easy to use!

The best freeware utility I could find so far is called WinSetupFromUSB. It has a very straightforward GUI and everything you need is included. It allows you to copy source files from a Windows setup image and copy them to your USB stick. Next you can easily boot from the USB stick (if supported by your PC and stick). I was able to install Windows 7 Beta from my USB stick with this nice tool.

Features
  • multiple Windows XP/2kX sources in the same partition (up to 10). They have to be in the first partition of the disk! Existing folders ~BT and ~LS and TXTSETUP.SIF will be renamed, and SETUPLDR.BIN and SETUPDD.SYS patched against the new names. Checksum checks are also corrected. BTS OEM folders are supported and renamed accordingly.
  • BartPE/WinBulder/UBCD4Win/WinFLPC (NOT ramdisk versions) to any primary partition. Multiple BartPE for example, in the SAME partition are NOT supported. Neither is the mix of them on a single partition.
  • Vista setup to different primary partitions. Multiple Vista sources in the SAME partition are NOT supported. Place your second Vista setup in another partition. It can be placed on any primary partition.
  • GParted 0.3.4-8 and 0.3.6-7, excellent open source partition manager.
  • SyLinux bootsector, and optionally folder, containing (Linux) distro, booting off SysLinux. For example you may extract UBCD411.ISO, and point it to this folder. Entire contents will be copied and entry for SysLinux will be added to the boot menu.
  • detects UBCD4Win and uses multiboot menu for it if folder IMAGES is found. Only default UBCD4Win multiboot options are added. Edit UBCD4Win.lst to add custom ones.
  • UBCD4Win boot menu is adjusted to boot from the selected partition. It can be placed on any primary partition.
  • if Windows setup folders (~BT and ~LS) and txtsetup.sif coexist in the same partition as BartPE/WinBuilder/UNCD4Win/WinFLPC, SETUPLDR.BIN of the latter is patched not to use txtsetup.sif in root. Checksum checks are also corrected.
  • grub4dos is the main bootloader/manager. Without it's advanced features, multiple partitions will not be easily achieved.
  • Bootsector loading GRLDR is installed in the active partition of the selected disk. Hence the requirement for active partition and MBR.
  • detailed log file is created in the folder, where program is executed from. Use it for troubleshooting. Upon next execution if log file is found, it's compressed in MS cab format, removed to BACKUPS folder and renamed with current DATE/TIME stamp.
  • upon installing grub4dos bootsector, backup of MBR and bootsector with DATE/TIME stamp are placed in BACKUPS folder. Use it in case something goes wrong.
  • if in Windows source folder winnt.sif or unattend.txt are found they will be used as answer file. Section UNATTENDED will be temporarily removed, only for the Text part of setup, and before start of GUI mode it will be merged back. PRESETUP.CMD is used for this purpose.
  • option to start the prepared USB disk in QEMU for testing purposes. Use carefully at own risk, do not attempt write operations!
  • tooltips on almost every element in the GUI
  • for multi partition USB stick use the cmd files in "files\tools\MULTIpartitionUSBstick". Works for 32bits Windows only! This is not thoroughly tested option, use at your risk.
Please read the included ReadMe.txt, it should help you get started. When in doubt hold the mouse over the element, a tooltip should help you with the choice.