I mostly use RegexBuddy to create and test my regular expressions, but I just came across some nice free online tools RegExr , RexV, JavaScript Regex Generator and Nregex to create and test regular expressions. Also useful, a toolbox, RegExp Tools and some examples of some commonly required regular expressions...
Monday, October 26, 2009


Friday, October 16, 2009
Dropbox - daily usage
 Dropbox is a free online service to easily synchronize and backup your data. It can be very useful and it has some very nice features, but it has some limitations too.
Dropbox features:
- 2GB free online storage, easy registration.
- Easy sync to different computers / Macs.
- Files are always reachable using the Dropbox website.
- Dropbox keeps 30 days version and deleted files history.
- A public folder with direct static file url's makes it possible to host your site on Dropbox server.
- Sharing of folders between Dropbox accounts is possible.
Dropbox limitation:
- No filtering on files / folders is possible.
- For each account, one folder is synchronized. You need to use Junctions (hardlink NTFS shortcuts (easy Junction explorer extention)) if you want to include external folders in the sync.
- No default support for multiple account synchronization. You need to use the portable Dropbox (see information below) if you want to synchronize multiple accounts from the same computer at the same time.
- No option to make Dropbox always request for account password on startup (would be useful for the portable version).
Personal usage scenario's:
- Synchronization of my AI Roboform data so I have all my login's everywhere. I combine this with the Roboform2go on my USB stick and Dropbox portable to make sure everything is kept in sync.
- Hosting of files for websites. Instead of having to upload them to different free hosts with ads, I can now use the Dropbox space for easy hosting. Even complete websites are usable when hosted within the 'public' folder of a Dropbox account.
- Combination of FreeOTFE portable to make sure my USB stick portable Dropbox account is kept save. I place all Dropbox files within a FreeOTFE secured file, since else when losing USB stick, anyone could have access to my Dropbox account by just starting up the portable Dropbox application.
Some other tips and tricks for Dropbox usage from LifeHacker. The 'start torrent from anywhere' trick is nice!
- Since I use my personal SVN I wanted to make a combination of the automatic Dropbox synchronization coupled to the full control SVN synchronization for development projects. By using the Junctions I could link the SVN folders into Dropbox. Now I have an auto sync of files and folders, but I can manually sync with SVN to have an extra backup and history tracking with full control. The downside of this is that all hidden '.svn' folders are kept in sync too within Dropbox and this can take a lot of your Dropbox space. With the selective sync option in Dropbox, you can disable the syncronisation of the .svn folders to save space. But be carefull, when deselecting .svn folders in the Dropbox configuration, it will remove those folders from your local system. So it’s best to first create some dummy empty .svn folders, next disable the sync of these folders and then copy the real .svn folder at the correct location.
Dropbox Portable installation:
DropboxPortableAHK is now available. This makes the use of Dropbox Portable much easier. All download/configuration is now automated and very userfriendly. Just download from the developer website: http://nionsoftware.com/dbpahk/overview
Update 09/01/2011: New version of the Dropbox Portable framework (5.3.4). But this new framework requires a relink! The new version has easier update (just copy official Dropbox setup file in the update folder). Cleanup of blog and added extra info on installation.
Update 20/01/2011: added info from comments to change path in config.db
Update 03/04/2011: link to new DropboPortableAHK version, no more manual tweaks required.
Sunday, October 11, 2009
Keep your batteries in good shape
I red a good article on how to keep your batteries in good shape: Dutch, Babelfish translated English version
Top tips:
Top tips:
- Make sure to recharge long enough before first usage
- Always use the original or exactly matching charger
- Nickel Cadmium (NiCd) batteries should be completely empty before recharging (a battery memory effect will shorten the battery live)
- These batteries are most often used as AAA or AA rechargeable batteries or older mobile phones
- Lithium Ion batteries should never be completely empty before recharging (no battery memory, but very sensitive to higher temperatures while charging)
- These batteries are most often used in mobile phones, pda's and notebooks
- It can help to put your batteries in a cool environment when you won't use them for some time.
Thursday, October 1, 2009
Folder structure creator - Excel VBS
If you need to create a lot of folders and subfolders,  with some specific structure, it can be usefull if you can use the power of Excel to make up your folder names and structure. All kind of easy and quick formulas can be used, and once the strucuture is set up, you can easily create the empty folder structure with just one click by using this little VBS macro. The base folder used will depend on the location of the Excel file, so make sure it's saved or copied in the correct folder.
The Excel sheet with the macro can be downloaded here. Before running the macro make sure the rows and columns of the active sheet are filled in correctly. Next simply run the macro by using the button.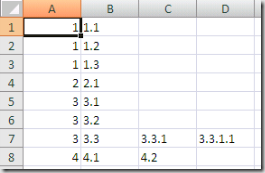
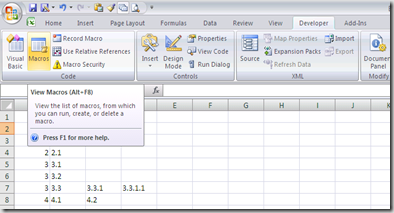

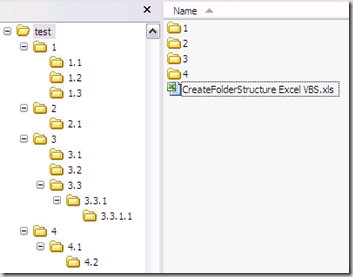
If you created to many empty folders by accident, you can easily remove them again using this little tool: Remove Empty Directories
Update 13/11/2009: Modified the Excel VBS script to let you navigate to the desired base folder upon launching the macro, so the Excel file may now be saved at any location, the base folder will have to be specified upon launching the macro.
Update 21/04/2012: Someone commented the VBS code is not working correctly when using some special characters. This is because some characters are not supported by Windows to be used in a file or folder name.

I updated the VBS code in the Excel sheet to make sure these special characters are removed before trying to create the folders.
The Excel sheet is updated, also an Excel template is available.
An example with special characters and the resulting folders created:

The new VBS code used is:
11/10/2012: I updated the VBS code in the Excel sheet to make sure these special characters are removed before trying to create the folders. Extra input information and validation is added to make sure invalid characters can not be used. The Excel sheet is updated
08/08/2013: Updated sheets, added a trim to remove spaces at begin and end of cell value, since this could result in macro exception (see comments)
17/02/2014: I’ve extended this workbook with a new sheet in which the nested folder structure of the filesystem can be imported. Each folder name will be stored in a separate cell respecting the nested structure
The new VBS code is:
The Excel file can be downloaded as XLS (template for easy reuse). My Excel sheet with combined macro’s has been updated as well, see this blog post.
Update 27/05/2014: cleanup of the cell types (some cell were saved as type ‘Scientific’ resulting in some strange representation after import of folders named with numbers, Thanks to Jean for reporting)
with some specific structure, it can be usefull if you can use the power of Excel to make up your folder names and structure. All kind of easy and quick formulas can be used, and once the strucuture is set up, you can easily create the empty folder structure with just one click by using this little VBS macro. The base folder used will depend on the location of the Excel file, so make sure it's saved or copied in the correct folder.Sub CreateFolderStructure()
'Create folder for all vlues in current sheet
'folders will be created in folder where the excel file was saved
'folders will be created from first row, first column, until empty row is found
'Example expected cell structure: (data starting in current sheet, column A, row 1)
'folder1 subfolder1 subsubfolder1
'folder2
'folder3 subfolder3
'...
'this will result in:
'\folder1\subfolder1\subsubfolder1
'\folder2
'\folder3\subfolder3
'...
Set fs = CreateObject("Scripting.FileSystemObject")
For iRow = 1 To 65000
pathToCreate = ActiveWorkbook.Path
For iColumn = 1 To 65000
currValue = Worksheets(ActiveCell.Worksheet.Name).Cells(iRow, iColumn).Value
If (currValue = "") Then
Exit For
Else
pathToCreate = pathToCreate & "\" & CStr(currValue)
'MsgBox (pathToCreate)
folderToCreate = pathToCreate
If Not (fs.FolderExists(folderToCreate)) Then
fs.CreateFolder (folderToCreate)
End If
End If
Next
Next
End Sub
The Excel sheet with the macro can be downloaded here. Before running the macro make sure the rows and columns of the active sheet are filled in correctly. Next simply run the macro by using the button.


If you created to many empty folders by accident, you can easily remove them again using this little tool: Remove Empty Directories
Update 13/11/2009: Modified the Excel VBS script to let you navigate to the desired base folder upon launching the macro, so the Excel file may now be saved at any location, the base folder will have to be specified upon launching the macro.
Update 21/04/2012: Someone commented the VBS code is not working correctly when using some special characters. This is because some characters are not supported by Windows to be used in a file or folder name.

I updated the VBS code in the Excel sheet to make sure these special characters are removed before trying to create the folders.
The Excel sheet is updated, also an Excel template is available.
An example with special characters and the resulting folders created:

The new VBS code used is:
Sub CreateFolderStructure() 'Create folder for all vlues in current sheet 'folders will be created in folder where the excel file was saved 'folders will be created from first row, first column, until empty row is found 'Example expected cell structure: (data starting in current sheet, column A, row 1) 'folder1 subfolder1 subsubfolder1 'folder2 'folder3 subfolder3 ' subfolder4 '... 'this will result in: '\folder1\subfolder1\subsubfolder1 ' \folder2 ' \folder3\subfolder3 ' \folder3\subfolder4 '... baseFolder = BrowseForFolder If (baseFolder = False) Then Exit Sub End If Set fs = CreateObject("Scripting.FileSystemObject") For iRow = 2 To 6500 pathToCreate = baseFolder leafFound = False For iColumn = 1 To 6500 currValue = Trim(Replace(Replace(Replace(Replace(Replace(Replace(Replace(Worksheets(ActiveCell.Worksheet.Name).Cells(iRow, iColumn).Value, ":", ""), "*", ""), "?", ""), Chr(34), ""), "<", ""), ">", ""), "|", "")) If (currValue = "" And leafFound) Then Exit For ElseIf (currValue = "") Then parentFolder = FindParentFolder(iRow, iColumn) parentFolder = Replace(Replace(Replace(Replace(Replace(Replace(Replace(parentFolder, ":", ""), "*", ""), "?", ""), Chr(34), ""), "<", ""), ">", ""), "|", "") If (parentFolder = False) Then Exit For Else pathToCreate = pathToCreate & "\" & parentFolder If Not (fs.FolderExists(pathToCreate)) Then CreateDirs (pathToCreate) End If End If Else leafFound = True pathToCreate = pathToCreate & "\" & currValue If Not (fs.FolderExists(pathToCreate)) Then CreateDirs (pathToCreate) End If End If Next If (leafFound = False) Then Exit For End If Next End Sub Function FindParentFolder(row, column) For iRow = row To 0 Step -1 currValue = Worksheets(ActiveCell.Worksheet.Name).Cells(iRow, column).Value If (currValue <> "") Then FindParentFolder = CStr(currValue) Exit Function ElseIf (column <> 1) Then leftValue = Worksheets(ActiveCell.Worksheet.Name).Cells(iRow, column - 1).Value If (leftValue <> "") Then FindParentFolder = False Exit Function End If End If Next End Function Function BrowseForFolder(Optional OpenAt As Variant) As Variant 'Function purpose: To Browser for a user selected folder. 'If the "OpenAt" path is provided, open the browser at that directory 'NOTE: If invalid, it will open at the Desktop level Dim ShellApp As Object 'Create a file browser window at the default folder Set ShellApp = CreateObject("Shell.Application"). _ BrowseForFolder(0, "Please choose a folder", 0, OpenAt) 'Set the folder to that selected. (On error in case cancelled) On Error Resume Next BrowseForFolder = ShellApp.self.Path On Error GoTo 0 'Destroy the Shell Application Set ShellApp = Nothing 'Check for invalid or non-entries and send to the Invalid error 'handler if found 'Valid selections can begin L: (where L is a letter) or '\\ (as in \\servername\sharename. All others are invalid Select Case Mid(BrowseForFolder, 2, 1) Case Is = ":" If Left(BrowseForFolder, 1) = ":" Then GoTo Invalid Case Is = "\" If Not Left(BrowseForFolder, 1) = "\" Then GoTo Invalid Case Else GoTo Invalid End Select Exit Function Invalid: 'If it was determined that the selection was invalid, set to False BrowseForFolder = False End Function Sub CreateDirs(MyDirName) ' This subroutine creates multiple folders like CMD.EXE's internal MD command. ' By default VBScript can only create one level of folders at a time (blows ' up otherwise!). ' ' Argument: ' MyDirName [string] folder(s) to be created, single or ' multi level, absolute or relative, ' "d:\folder\subfolder" format or UNC ' ' Written by Todd Reeves ' Modified by Rob van der Woude ' http://www.robvanderwoude.com Dim arrDirs, i, idxFirst, objFSO, strDir, strDirBuild ' Create a file system object Set objFSO = CreateObject("Scripting.FileSystemObject") ' Convert relative to absolute path strDir = objFSO.GetAbsolutePathName(MyDirName) ' Split a multi level path in its "components" arrDirs = Split(strDir, "\") ' Check if the absolute path is UNC or not If Left(strDir, 2) = "\\" Then strDirBuild = "\\" & arrDirs(2) & "\" & arrDirs(3) & "\" idxFirst = 4 Else strDirBuild = arrDirs(0) & "\" idxFirst = 1 End If ' Check each (sub)folder and create it if it doesn't exist For i = idxFirst To UBound(arrDirs) strDirBuild = objFSO.BuildPath(strDirBuild, arrDirs(i)) If Not objFSO.FolderExists(strDirBuild) Then objFSO.CreateFolder strDirBuild End If Next ' Release the file system object Set objFSO = Nothing End Sub
11/10/2012: I updated the VBS code in the Excel sheet to make sure these special characters are removed before trying to create the folders. Extra input information and validation is added to make sure invalid characters can not be used. The Excel sheet is updated
08/08/2013: Updated sheets, added a trim to remove spaces at begin and end of cell value, since this could result in macro exception (see comments)
17/02/2014: I’ve extended this workbook with a new sheet in which the nested folder structure of the filesystem can be imported. Each folder name will be stored in a separate cell respecting the nested structure
The new VBS code is:
Sub ImportFolderStructure()
'Import folder structure starting from selected base folder
'each subfolder will be stored in a separete cell
'eg:
'Folder 1|Subfolder1|SubSubfolder1
'Folder 2|Subfolder2
'Folder 3|Subfolder3|SubSubfolder3
'...
    Application.ScreenUpdating = False
    baseFolder = BrowseForFolder
    If (baseFolder = False) Then
        Exit Sub
    End If
    Application.StatusBar = "Folder structure below " & baseFolder & " will be stored in the sheet " & ActiveCell.Worksheet.Name
    StoreSubFolder baseFolder, 1, 0
    Application.StatusBar = "Folder structure below " & baseFolder & " has been stored in the sheet " & ActiveCell.Worksheet.Name
    Range("A2").Select
    Application.ScreenUpdating = True
End Sub

Sub StoreSubFolder(baseFolderObj, ByRef iRow, ByVal iColumn)
    Set fs = CreateObject("Scripting.FileSystemObject")
    Set folderBase = fs.GetFolder(baseFolderObj)
    Set folderBaseSubs = folderBase.SubFolders
    iRow = iRow + 1
    iColumn = iColumn + 1
    For Each subFolder In folderBaseSubs
        Worksheets(ActiveCell.Worksheet.Name).Cells(iRow, iColumn).Value = subFolder.Name
        StoreSubFolder subFolder, iRow, iColumn
    Next
End Sub

Sub ClearImportData()
    Application.ScreenUpdating = False
    Range("A2").Select
    Range(Selection, ActiveCell.SpecialCells(xlLastCell)).Select
    Selection.ClearContents
    Range("A2").Select
    Application.ScreenUpdating = True
End Sub

Sub CreateFolderStructure()
'Create folder for all vlues in current sheet
'folders will be created in folder where the excel file was saved
'folders will be created from first row, first column, until empty row is found
'Example expected cell structure: (data starting in current sheet, column A, row 1)
'folder1    subfolder1  subsubfolder1
'folder2
'folder3    subfolder3
'           subfolder4
'...
'this will result in:
'<currentpath>\folder1\subfolder1\subsubfolder1
'<currentpath>\folder2
'<currentpath>\folder3\subfolder3
'<currentpath>\folder3\subfolder4
'...
    baseFolder = BrowseForFolder
    If (baseFolder = False) Then
        Exit Sub
    End If
    Set fs = CreateObject("Scripting.FileSystemObject")
    For iRow = 2 To 6500
        pathToCreate = baseFolder
        leafFound = False
        For iColumn = 1 To 6500
            currValue = Trim(Replace(Replace(Replace(Replace(Replace(Replace(Replace(Replace(Replace(Worksheets(ActiveCell.Worksheet.Name).Cells(iRow, iColumn).Value, ":", "-"), "*", "-"), "?", "-"), Chr(34), "-"), "<", "-"), ">", "-"), "|", "-"), "/", "-"), "\", "-"))
            Worksheets(ActiveCell.Worksheet.Name).Cells(iRow, iColumn).Value = currValue
            If (currValue = "" And leafFound) Then
                Exit For
            ElseIf (currValue = "") Then
                parentFolder = FindParentFolder(iRow, iColumn)
                If (parentFolder = False) Then
                    Exit For
                Else
                    pathToCreate = pathToCreate & "\" & parentFolder
                    If Not (fs.FolderExists(pathToCreate)) Then
                        CreateDirs (pathToCreate)
                    End If
                End If
            Else
                leafFound = True
                pathToCreate = pathToCreate & "\" & currValue
                If Not (fs.FolderExists(pathToCreate)) Then
                    CreateDirs (pathToCreate)
                End If
            End If
        Next
        If (leafFound = False) Then
            Exit For
        End If
    Next
End Sub

Function FindParentFolder(row, column)
    For iRow = row To 0 Step -1
        currValue = Worksheets(ActiveCell.Worksheet.Name).Cells(iRow, column).Value
        If (currValue <> "") Then
            FindParentFolder = CStr(currValue)
            Exit Function
        ElseIf (column <> 1) Then
            leftValue = Worksheets(ActiveCell.Worksheet.Name).Cells(iRow, column - 1).Value
            If (leftValue <> "") Then
                FindParentFolder = False
                Exit Function
            End If
        End If
    Next
End Function

Function BrowseForFolder(Optional OpenAt As Variant) As Variant
     'Function purpose:  To Browser for a user selected folder.
     'If the "OpenAt" path is provided, open the browser at that directory
     'NOTE:  If invalid, it will open at the Desktop level

    Dim ShellApp As Object

     'Create a file browser window at the default folder
    Set ShellApp = CreateObject("Shell.Application"). _
    BrowseForFolder(0, "Please choose a folder", 0, OpenAt)
     'Set the folder to that selected.  (On error in case cancelled)
    On Error Resume Next
    BrowseForFolder = ShellApp.self.Path
    On Error GoTo 0

     'Destroy the Shell Application
    Set ShellApp = Nothing

     'Check for invalid or non-entries and send to the Invalid error
     'handler if found
     'Valid selections can begin L: (where L is a letter) or
     '\\ (as in \\servername\sharename.  All others are invalid
    Select Case Mid(BrowseForFolder, 2, 1)
    Case Is = ":"
        If Left(BrowseForFolder, 1) = ":" Then GoTo Invalid
    Case Is = "\"
        If Not Left(BrowseForFolder, 1) = "\" Then GoTo Invalid
    Case Else
        GoTo Invalid
    End Select

    Exit Function

Invalid:
     'If it was determined that the selection was invalid, set to False
    BrowseForFolder = False

End Function

Sub CreateDirs(MyDirName)
' This subroutine creates multiple folders like CMD.EXE's internal MD command.
' By default VBScript can only create one level of folders at a time (blows
' up otherwise!).
'
' Argument:
' MyDirName   [string]   folder(s) to be created, single or
'                        multi level, absolute or relative,
'                        "d:\folder\subfolder" format or UNC
'
' Written by Todd Reeves
' Modified by Rob van der Woude
' http://www.robvanderwoude.com

    Dim arrDirs, i, idxFirst, objFSO, strDir, strDirBuild
    ' Create a file system object
    Set objFSO = CreateObject("Scripting.FileSystemObject")
    ' Convert relative to absolute path
    strDir = objFSO.GetAbsolutePathName(MyDirName)
    ' Split a multi level path in its "components"
    arrDirs = Split(strDir, "\")
    ' Check if the absolute path is UNC or not
    If Left(strDir, 2) = "\\" Then
        strDirBuild = "\\" & arrDirs(2) & "\" & arrDirs(3) & "\"
        idxFirst = 4
    Else
        strDirBuild = arrDirs(0) & "\"
        idxFirst = 1
    End If

    ' Check each (sub)folder and create it if it doesn't exist
    For i = idxFirst To UBound(arrDirs)
        strDirBuild = objFSO.BuildPath(strDirBuild, arrDirs(i))
        If Not objFSO.FolderExists(strDirBuild) Then
            objFSO.CreateFolder strDirBuild
        End If
    Next

    ' Release the file system object
    Set objFSO = Nothing
End Sub
The Excel file can be downloaded as XLS (template for easy reuse). My Excel sheet with combined macro’s has been updated as well, see this blog post.
Update 27/05/2014: cleanup of the cell types (some cell were saved as type ‘Scientific’ resulting in some strange representation after import of folders named with numbers, Thanks to Jean for reporting)
Wednesday, September 16, 2009
Mouse rocker gestures

Based on the AutoHotKey script from Adam Pash on the Lifehacker site, I made my own version to fit my personal mouse rocker gesture needs.
Basically, a mouse rocker gesture requires that you press one mouse button, hold it down, then press the other. You can rock across the mouse from right-to-left or left-to-right; each direction you rock gives you a different result. Once you get used to this gesture, the name makes perfect sense, and you'll wonder why you weren't mouse rocking your whole life.
I changed the way the script is configured so one can now easily add process names in the rocker.ini file to change the behaviour for a specific application. And I added extra navigation combinations so one should be able to easily make it fit his own needs.
For example in excel you can now easily switch to the next or previous tabbed sheet using mouse rocker gestures. UltraEdit switching between open files is also supported by sending 'Alt + up' or 'Alt + down' keys with the mouse rocker gestures. On first run, it will now also ask if you want to start the tool automatically during windows start. The ini file is created on first run in the directory from where the rocker.exe file is launched. The different groups denote the keys that will be send when a mouse rocker gesture is detected, one can easily add or remove any process name to change the behaviour in a specific application.
[Preferences]
CtrlGroup=itunes.exe
CtrlTabGroup=notepad++.exe,dreamweaver.exe,pidgin.exe
CtrlUpDnGroup=empty
CtrlPgUpDnGroup=excel.exe
AltGroup=firefox.exe,iexplore.exe,opera.exe,feeddemon.exe,explorer.exe
AltUpDnGroup=uedit32.exe
AltPgUpDnGroup=empty
BckspGroup=empty
IgnoreGroup=empty
Startup=1
UpdateCheck=0
Version=0.3
No installation is required, just download the zip file, extract and run the exe. The AutoHotKey source script is included in the zip file.
Update 19/02/2011: links updated
Update 20/12/2017: links updated
Hibernate subquery join using Criteria

I recently needed to create max query in hibernate returning an object instead of the maximal value of the field and I wanted to do this using Hibernate Criteria in our JPA environment.
A simple example of what I wanted:
select *
from user
where userid = (select max(userid)
from user
where company = 'aCompanyName')
The way to program this in JPA/Hibernate using Criterias, DetachedCriteria and Subqueries. Make sure to use Subqueries.propertyEq instead of Subqueries.eq if you want to join on a field:
public User getMaxUserOfCompany(String companyName) {
 Session session = (Session) em.getDelegate();
 DetachedCriteria subCriteria = DetachedCriteria.forClass(User.class);
 subCriteria.add(Restrictions.eq("company", companyName));
 subCriteria.setProjection(Projections.max("userid") );
 Criteria criteria = session.createCriteria(User.class);
 criteria.add(Subqueries.propertyEq("userid", subCriteria));
 return (User) criteria.uniqueResult();
}
Thursday, July 2, 2009
SpeedTouch ADSL router patch
Below is shown how to flash a SpeedTouch router with a new firmware when the administrator password is not known, and then patch the SpeedTouch 716v5 router to disable the ADSL modem and use it as a standard 3-port lan router, 1 port will be used for incoming internet (wan). The configuration was provided by Thomson.
Recently we had to leave Tele2 with theire very nice unlimited offering. We joined Telenet because we coulnd't connect but through a coax cable in our new house.
For Tele2, we had to buy a ADSL modem + router, the Thomson Alcatel SpeedTouch 716v5. It's a very nice router with Wifi and VOIP integrated. Since this router was still working fine, I didn't want to throw it away. But the problem is that Tele2 puts an administrator password on it, and they didn't want to remove the password or provide it to me. To flash a new rom on the router, you also need to have the administrator password.
I was able to find a method to flash a new rom on the router without having the administrator rights. I flashed this (afterwards I used 6.2.29.2) rom onto it:
-connect your computer with a lan cable to the SpeedTouch router
-assign a static ip to your network card, you can just copy the settings you got when you received an IP from the DHCP
-start the flashing by executing the upgrade file
-when the upgrade requests for the router password, use a small screwdriver to push the reset button and keep this reset button pressed. In the meantime power off the SpeedTouch and power it on again. Keep on pressing the reset button and wait for 10 - 15 seconds. The power led will blink red, now you can release the reset button.
-Quickly press back on the upgrade flasher, the software will search again for the SpeedTouch device and continue the upgrade without requesting the administrator password.
I had to do it over some times before all went right, but at the end I managed to flash the default SpeedTouch716v5 rom v 6.1.7.2 and afterwards v6.2.29.2
Once the default rom is installed, you will have Administrator rights by logging in using: username Administrator and emtpy password.
Next, I configured the router to not use ADSL modem anymore, but use the 4th lan port as incoming internet connection and distribute the internet over Wifi and the remaining 3 lan ports with the build in DHCP server. The commands must be put in using telnet: Start -> Run -> cmd -> telnet, login with user Administrator and password (empty by default).
:ppp relay flush
:ppp flush
:eth flush
:atm flush
:atm phonebook flush
:eth bridge ifdelete intf=ethport4
:eth ifadd intf=eth_wan
:eth ifconfig intf=eth_wan dest=ethif4
:eth ifattach intf=eth_wan
:ip ifadd intf=ip_wan_eth dest=eth_wan
:ip ifconfig intf=ip_wan_eth status=up
:ip ifattach intf=ip_wan_eth
:nat ifconfig intf=ip_wan_eth translation=enabled
:dhcp client ifadd intf=ip_wan_eth
:dhcp client ifconfig intf=ip_wan_eth metric=5 dnsmetric=5
:dhcp client rqoptions add intf=ip_wan_eth option=dhcp-lease-time
:dhcp client rqoptions add intf=ip_wan_eth option=dhcp-renewal-time
:dhcp client rqoptions add intf=ip_wan_eth option=dhcp-rebinding-time
:dhcp client rqoptions add intf=ip_wan_eth option=subnet-mask
:dhcp client rqoptions add intf=ip_wan_eth option=classless-static-routes
:dhcp client rqoptions add intf=ip_wan_eth option=default-routers
:dhcp client rqoptions add intf=ip_wan_eth option=classfull-static-routes
:dhcp client rqoptions add intf=ip_wan_eth option=domain-name-servers
:dhcp client ifattach intf=ip_wan_eth
:saveall
You can now connect your incoming internet connection on LAN port 4 and the internet will be distributed over the other LAN ports and Wifi. I tested this method with rom version 6.2. But then the internet was only distributed over the 3 remaining LAN ports, and not over the WIFI connections.
Update 18/04/2010: working with 6.2.29.2.
Finaly, I configured VOIP. I find out Weepee was very cheap and working very well so far. They have a very fast email support. To get a Weepee fixed line telephone number it costs 9 euros. One time fee! You can chose to receive a new number or transfer your existing fixed number, either way it will cost only 9euros. After this one time cost, you only have to pay for the calls you make, and the rates are very competitive.
To configure Weepee VOIP on my SpeedTouch, I used these VOIP settings:
SIP URI: SIP username provided by Weepee (12 numbers, starting with 32)
Username: SIP username provided by Weepee (12 numbers, starting with 32)
Password: SIP password provided by Weepee
Displayname: SIP username provided by Weepee
Abbreviated number: SIP username provided by Weepee
Port: Phone 1
Expert VOIP configuration:
Registrar: SIP server provided by Weepee, ssw7.weepee.org
Registrar Port: 5060
Proxy: SIP server provided by Weepee, ssw7.weepee.org
Proxy prot: 5060
Expire time: 3600
That should do the trick. I hope someone else can benefit from it.
Update: 8/11/2009
WeePee now has native support for Skype over VOIP. You can be called and make calls for free over Skype. To make it work you'll need to follow these steps:
- Login into WeePee client configuration panel: https://ssl.weepee.org/klanten/flash
- Go to 'Information' -> 'Skype'. As mentioned on this page, you need a Skype Business Account. You'll need to create a new account through the Skype Business Account User management panel using the Skype button 'Create a business account'. (It doesn't work by registering an existing account into Skype Business)
- When the Skype business account is created, you'll need to login once using Skype normally. This way, you'll be able to add your contacts into this account too.
- Now you can provided the Skype username and password of the Skype Business Account into WeePee client configuration panel. Click on the 'Create' button to connect Skype into Weepee. Your status should change to 'Online'.
- To make calls over Skype through WeePee, click on the tab menu 'Short numbers' within the WeePee client configuration panel. For each of your Skype contacts, add a shortcode by adding the 'skype#<skypeusername>' for each shortcode. No you can call your Skype contacts by calling for example '25' from your phone.
Update 09/04/2010: new link for speedtouch rom
Update 18/04/2010: new rom version 6.2.29.2 which works with the specific lan configuration
Sunday, May 24, 2009
Cobol data + Cobol copybook + Java conversion
Although I'm absolutely not a fan of Cobol, it's still inevitable in the Finance IT development sector.
Lately, we needed a way to let Cobol and Java data work together, and we didn't want to hard code the complete data structure. To make this possible we noticed different non-free applications exist, but the open source project Cb2Xml got our attention.
This project already worked out some Java code to parse a Cobol copybook and convert it into an XML representation. (The copybook can be seen as the interface of the Cobol data). But this project was mend to import and export data from xml to Cobol stream and vice-versa, while we needed some Java objects to work with the received Cobol data input.
So I added some extra code to convert a Cobol data stream (String) into a Java object (using a Hashtable internally). Now, it's possible to provide a String of Cobol data and its interface definition (Cobol copybook file) and return a Java CobolElements object. One can search in this CobolElements object based on the name or xpath. I made a simple example to test, which might make it clear how to use the code.
A simple example of Cobol copybook used as data interface:
01 ACCOUNT-GROUP .02 ACCOUNT .03 DFND PIC 9(4) .03 DCTB .04 DUPD PIC 9(8) .04 DNUMCTB .05 DCTB-12 PIC 9(12) .05 DCTB-04 PIC 9(4) .05 DFMT PIC 9(2) .04 DCDRCTB .05 DRGOCDRCTB PIC 9(1) .05 DROFCMCCDRCTB PIC 9(3) .05 DBRACMCCDRCTB .06 DBRACMCCDRCTB PIC 9(6) .06 GBRACDRCTBREDEFINES DBRACMCCDRCTB .07 DROFCDRCTB PIC 9(3) .07 DBRACDRCTB PIC 9(3) .04 DBLK PIC 9(2)OCCURS 5 .04 DBLK2 PIC 9(3)OCCURS 5 .
The data that should match this copybook:
input = "00000000000039300022955600000123703602231122334455111222333444555"; Converting the data to a Java CobolElements object:
- Converting the copybook to an xml representation (this XML Document should be created once for each copybook and can be cached):
Document cb2doc = Cb2Xml.convert(new File(_cobolCopybookFileName), _debug); - Converting the Cobol data stream (input string) to it's matching Java representation:
CobolElements cobolElements = Dat2Java.convertWithDoc(input, cb2doc);
Retrieving data from the CobolElements object:
CobolElement childElement = cobolElements.retrieveChildElement("GOUTCTT-CSISEQ/GANSCTT-CSISEQ/GCTB/GNUMCTB/NCTB-12");System.out.println(childElement.getData());//returns: 393000229556childElement = cobolElements.retrieveChildElement("ACCOUNT-GROUP/ACCOUNT/DCTB/DBLK[3]");System.out.println(childElement.getData());//returns: 44
Download source and jar (zip 1,78MB) (link updated 16/09/2009)
Update (27/11/2009): After creating the cobol2java, we found another interesting open source project called LegStar. They have a completely worked out solution, while the code we use is quite basic and only usable with simple copy books...
Eclipse project

- Save the batch script bellow and make sure the correct Eclipse.exe file is used. You might want to change the Eclipse options if required.
- Double click on a .project file, the first time Windows will ask how to open this file. Choose the .bat batch file script to open your .project file and make sure to make Windows remembers this option.
- Eclipse will now open with the correct workspace loaded.
@echo offset ECLIPSE_BIN=R:\tools\eclipse\eclipse.exeset ECLIPSE_OPTIONS=-refresh -showlocation -Xmx512M -XX:MaxPermSize=512mset PROJECT_FULL_PATH=%1%set PROJECT_FOLDER=%PROJECT_FULL_PATH:.project=%cd %PROJECT_FOLDER%cd ..set PROJECT_WORKSPACE="%CD%"start "eclipse" "%ECLIPSE_BIN%" %ECLIPSE_OPTIONS% -data %PROJECT_WORKSPACE%@echo on
Monday, May 11, 2009
LogExpert - Windows tail freeware
Today I tested yet another Windows tail application, LogExpert, and I was very amazed with its features!
 It has most of the features I'm used to work with in BareTail Pro, like adding some filters (regex) or highlighting lines matching some text. And unlike WinLogTail, it does support opening multiple files at one with a tabbed interface as in BareTail.
Besides all this, I really appreciate the following functions:
 It has most of the features I'm used to work with in BareTail Pro, like adding some filters (regex) or highlighting lines matching some text. And unlike WinLogTail, it does support opening multiple files at one with a tabbed interface as in BareTail.
 Besides all this, I really appreciate the following functions:
- run some specified application and providing some information of the selected line. This way, one can easily open the tailed file within UltraEdit on the selected line.
- parse the timestamps of a log file and show these in separated columns
- freeze some columns to make these alway be shown and only scrolling other columns (horizontal scrolling)
- advanced filtering with possibility to show some lines before or after the line matching your filter
- activate an 'edit' mode to easily copy some parts of a line
- add some bookmarks and comments on a line to easily find these back afterwards
- support for multifiles (show files as app.log, app.log1, app.log2, etc as one big file)
- support for different files provided on the command line while opening, so the scripts we used to open many files with BareTail also work with LogExpert (but opening many files from shared drives is not as lighting fast as with BareTail)
So, compared to BareTail it has many benefits and it's completely free! But one should know, it's not always as fast and stable as BareTail, but so far it worked very well for me.
Some nice screenshots (but those only show a small subset of all it's features):


Sunday, April 26, 2009
Find-Replace text in files from command line
In Linux one can easily find and replace some text in files by using the sed application. In Windows, I couldn’t find a decent build in equivalent. I ended by using the ported version of sed for Windows. I works quite well using the same syntax and doesn’t require to be installed. Just make sure sed.exe, libiconv2.dll and libintl3.dll are existing in the same folder or on the classpath.
One should know any file altered by sed for Windows will result in this file being also converted from Windows line ending (using 2 characters: Carriage Return + Line Feed) to Linux line endings (only 1 character: Line Feed). This can sometime give some strange results. To overcome this, one should make sure the last replacement in the file is set to replace the Line Feeds back to Carriage Return + Line Feed:
sed -i "s/$/\r/" "%DIR%\file.txt"
Some other useful sed commands are available from sed sourcefourge:
FILE SPACING:# double space a filesed G# double space a file which already has blank lines in it. Output file# should contain no more than one blank line between lines of text.sed '/^$/d;G'# triple space a filesed 'G;G'# undo double-spacing (assumes even-numbered lines are always blank)sed 'n;d'# insert a blank line above every line which matches "regex"sed '/regex/{x;p;x;}'# insert a blank line below every line which matches "regex"sed '/regex/G'# insert a blank line above and below every line which matches "regex"sed '/regex/{x;p;x;G;}'NUMBERING:# number each line of a file (simple left alignment). Using a tab (see# note on '\t' at end of file) instead of space will preserve margins.sed = filename | sed 'N;s/\n/\t/'# number each line of a file (number on left, right-aligned)sed = filename | sed 'N; s/^/ /; s/ *\(.\{6,\}\)\n/\1 /'# number each line of file, but only print numbers if line is not blanksed '/./=' filename | sed '/./N; s/\n/ /'# count lines (emulates "wc -l")sed -n '$='TEXT CONVERSION AND SUBSTITUTION:# IN UNIX ENVIRONMENT: convert DOS newlines (CR/LF) to Unix format.sed 's/.$//' # assumes that all lines end with CR/LFsed 's/^M$//' # in bash/tcsh, press Ctrl-V then Ctrl-Msed 's/\x0D$//' # works on ssed, gsed 3.02.80 or higher# IN UNIX ENVIRONMENT: convert Unix newlines (LF) to DOS format.sed "s/$/`echo -e \\\r`/" # command line under kshsed 's/$'"/`echo \\\r`/" # command line under bashsed "s/$/`echo \\\r`/" # command line under zshsed 's/$/\r/' # gsed 3.02.80 or higher# IN DOS ENVIRONMENT: convert Unix newlines (LF) to DOS format.sed "s/$//" # method 1sed -n p # method 2# IN DOS ENVIRONMENT: convert DOS newlines (CR/LF) to Unix format.# Can only be done with UnxUtils sed, version 4.0.7 or higher. The# UnxUtils version can be identified by the custom "--text" switch# which appears when you use the "--help" switch. Otherwise, changing# DOS newlines to Unix newlines cannot be done with sed in a DOS# environment. Use "tr" instead.sed "s/\r//" infile >outfile # UnxUtils sed v4.0.7 or highertr -d \r <infile >outfile # GNU tr version 1.22 or higher# delete leading whitespace (spaces, tabs) from front of each line# aligns all text flush leftsed 's/^[ \t]*//' # see note on '\t' at end of file# delete trailing whitespace (spaces, tabs) from end of each linesed 's/[ \t]*$//' # see note on '\t' at end of file# delete BOTH leading and trailing whitespace from each linesed 's/^[ \t]*//;s/[ \t]*$//'# insert 5 blank spaces at beginning of each line (make page offset)sed 's/^/ /'# align all text flush right on a 79-column widthsed -e :a -e 's/^.\{1,78\}$/ &/;ta' # set at 78 plus 1 space# center all text in the middle of 79-column width. In method 1,# spaces at the beginning of the line are significant, and trailing# spaces are appended at the end of the line. In method 2, spaces at# the beginning of the line are discarded in centering the line, and# no trailing spaces appear at the end of lines.sed -e :a -e 's/^.\{1,77\}$/ & /;ta' # method 1sed -e :a -e 's/^.\{1,77\}$/ &/;ta' -e 's/\( *\)\1/\1/' # method 2# substitute (find and replace) "foo" with "bar" on each linesed 's/foo/bar/' # replaces only 1st instance in a linesed 's/foo/bar/4' # replaces only 4th instance in a linesed 's/foo/bar/g' # replaces ALL instances in a linesed 's/\(.*\)foo\(.*foo\)/\1bar\2/' # replace the next-to-last casesed 's/\(.*\)foo/\1bar/' # replace only the last case# substitute "foo" with "bar" ONLY for lines which contain "baz"sed '/baz/s/foo/bar/g'# substitute "foo" with "bar" EXCEPT for lines which contain "baz"sed '/baz/!s/foo/bar/g'# change "scarlet" or "ruby" or "puce" to "red"sed 's/scarlet/red/g;s/ruby/red/g;s/puce/red/g' # most sedsgsed 's/scarlet\|ruby\|puce/red/g' # GNU sed only# reverse order of lines (emulates "tac")# bug/feature in HHsed v1.5 causes blank lines to be deletedsed '1!G;h;$!d' # method 1sed -n '1!G;h;$p' # method 2# reverse each character on the line (emulates "rev")sed '/\n/!G;s/\(.\)\(.*\n\)/&\2\1/;//D;s/.//'# join pairs of lines side-by-side (like "paste")sed '$!N;s/\n/ /'# if a line ends with a backslash, append the next line to itsed -e :a -e '/\\$/N; s/\\\n//; ta'# if a line begins with an equal sign, append it to the previous line# and replace the "=" with a single spacesed -e :a -e '$!N;s/\n=/ /;ta' -e 'P;D'# add commas to numeric strings, changing "1234567" to "1,234,567"gsed ':a;s/\B[0-9]\{3\}\>/,&/;ta' # GNU sedsed -e :a -e 's/\(.*[0-9]\)\([0-9]\{3\}\)/\1,\2/;ta' # other seds# add commas to numbers with decimal points and minus signs (GNU sed)gsed -r ':a;s/(^|[^0-9.])([0-9]+)([0-9]{3})/\1\2,\3/g;ta'# add a blank line every 5 lines (after lines 5, 10, 15, 20, etc.)gsed '0~5G' # GNU sed onlysed 'n;n;n;n;G;' # other sedsSELECTIVE PRINTING OF CERTAIN LINES:# print first 10 lines of file (emulates behavior of "head")sed 10q# print first line of file (emulates "head -1")sed q# print the last 10 lines of a file (emulates "tail")sed -e :a -e '$q;N;11,$D;ba'# print the last 2 lines of a file (emulates "tail -2")sed '$!N;$!D'# print the last line of a file (emulates "tail -1")sed '$!d' # method 1sed -n '$p' # method 2# print the next-to-the-last line of a filesed -e '$!{h;d;}' -e x # for 1-line files, print blank linesed -e '1{$q;}' -e '$!{h;d;}' -e x # for 1-line files, print the linesed -e '1{$d;}' -e '$!{h;d;}' -e x # for 1-line files, print nothing# print only lines which match regular expression (emulates "grep")sed -n '/regexp/p' # method 1sed '/regexp/!d' # method 2# print only lines which do NOT match regexp (emulates "grep -v")sed -n '/regexp/!p' # method 1, corresponds to abovesed '/regexp/d' # method 2, simpler syntax# print the line immediately before a regexp, but not the line# containing the regexpsed -n '/regexp/{g;1!p;};h'# print the line immediately after a regexp, but not the line# containing the regexpsed -n '/regexp/{n;p;}'# print 1 line of context before and after regexp, with line number# indicating where the regexp occurred (similar to "grep -A1 -B1")sed -n -e '/regexp/{=;x;1!p;g;$!N;p;D;}' -e h# grep for AAA and BBB and CCC (in any order)sed '/AAA/!d; /BBB/!d; /CCC/!d'# grep for AAA and BBB and CCC (in that order)sed '/AAA.*BBB.*CCC/!d'# grep for AAA or BBB or CCC (emulates "egrep")sed -e '/AAA/b' -e '/BBB/b' -e '/CCC/b' -e d # most sedsgsed '/AAA\|BBB\|CCC/!d' # GNU sed only# print paragraph if it contains AAA (blank lines separate paragraphs)# HHsed v1.5 must insert a 'G;' after 'x;' in the next 3 scripts belowsed -e '/./{H;$!d;}' -e 'x;/AAA/!d;'# print paragraph if it contains AAA and BBB and CCC (in any order)sed -e '/./{H;$!d;}' -e 'x;/AAA/!d;/BBB/!d;/CCC/!d'# print paragraph if it contains AAA or BBB or CCCsed -e '/./{H;$!d;}' -e 'x;/AAA/b' -e '/BBB/b' -e '/CCC/b' -e dgsed '/./{H;$!d;};x;/AAA\|BBB\|CCC/b;d' # GNU sed only# print only lines of 65 characters or longersed -n '/^.\{65\}/p'# print only lines of less than 65 characterssed -n '/^.\{65\}/!p' # method 1, corresponds to abovesed '/^.\{65\}/d' # method 2, simpler syntax# print section of file from regular expression to end of filesed -n '/regexp/,$p'# print section of file based on line numbers (lines 8-12, inclusive)sed -n '8,12p' # method 1sed '8,12!d' # method 2# print line number 52sed -n '52p' # method 1sed '52!d' # method 2sed '52q;d' # method 3, efficient on large files# beginning at line 3, print every 7th linegsed -n '3~7p' # GNU sed onlysed -n '3,${p;n;n;n;n;n;n;}' # other seds# print section of file between two regular expressions (inclusive)sed -n '/Iowa/,/Montana/p' # case sensitiveSELECTIVE DELETION OF CERTAIN LINES:# print all of file EXCEPT section between 2 regular expressionssed '/Iowa/,/Montana/d'# delete duplicate, consecutive lines from a file (emulates "uniq").# First line in a set of duplicate lines is kept, rest are deleted.sed '$!N; /^\(.*\)\n\1$/!P; D'# delete duplicate, nonconsecutive lines from a file. Beware not to# overflow the buffer size of the hold space, or else use GNU sed.sed -n 'G; s/\n/&&/; /^\([ -~]*\n\).*\n\1/d; s/\n//; h; P'# delete all lines except duplicate lines (emulates "uniq -d").sed '$!N; s/^\(.*\)\n\1$/\1/; t; D'# delete the first 10 lines of a filesed '1,10d'# delete the last line of a filesed '$d'# delete the last 2 lines of a filesed 'N;$!P;$!D;$d'# delete the last 10 lines of a filesed -e :a -e '$d;N;2,10ba' -e 'P;D' # method 1sed -n -e :a -e '1,10!{P;N;D;};N;ba' # method 2# delete every 8th linegsed '0~8d' # GNU sed onlysed 'n;n;n;n;n;n;n;d;' # other seds# delete lines matching patternsed '/pattern/d'# delete ALL blank lines from a file (same as "grep '.' ")sed '/^$/d' # method 1sed '/./!d' # method 2# delete all CONSECUTIVE blank lines from file except the first; also# deletes all blank lines from top and end of file (emulates "cat -s")sed '/./,/^$/!d' # method 1, allows 0 blanks at top, 1 at EOFsed '/^$/N;/\n$/D' # method 2, allows 1 blank at top, 0 at EOF# delete all CONSECUTIVE blank lines from file except the first 2:sed '/^$/N;/\n$/N;//D'# delete all leading blank lines at top of filesed '/./,$!d'# delete all trailing blank lines at end of filesed -e :a -e '/^\n*$/{$d;N;ba' -e '}' # works on all sedssed -e :a -e '/^\n*$/N;/\n$/ba' # ditto, except for gsed 3.02.*# delete the last line of each paragraphsed -n '/^$/{p;h;};/./{x;/./p;}'SPECIAL APPLICATIONS:# remove nroff overstrikes (char, backspace) from man pages. The 'echo'# command may need an -e switch if you use Unix System V or bash shell.sed "s/.`echo \\\b`//g" # double quotes required for Unix environmentsed 's/.^H//g' # in bash/tcsh, press Ctrl-V and then Ctrl-Hsed 's/.\x08//g' # hex expression for sed 1.5, GNU sed, ssed# get Usenet/e-mail message headersed '/^$/q' # deletes everything after first blank line# get Usenet/e-mail message bodysed '1,/^$/d' # deletes everything up to first blank line# get Subject header, but remove initial "Subject: " portionsed '/^Subject: */!d; s///;q'# get return address headersed '/^Reply-To:/q; /^From:/h; /./d;g;q'# parse out the address proper. Pulls out the e-mail address by itself# from the 1-line return address header (see preceding script)sed 's/ *(.*)//; s/>.*//; s/.*[:<] *//'# add a leading angle bracket and space to each line (quote a message)sed 's/^/> /'# delete leading angle bracket & space from each line (unquote a message)sed 's/^> //'# remove most HTML tags (accommodates multiple-line tags)sed -e :a -e 's/<[^>]*>//g;/</N;//ba'# extract multi-part uuencoded binaries, removing extraneous header# info, so that only the uuencoded portion remains. Files passed to# sed must be passed in the proper order. Version 1 can be entered# from the command line; version 2 can be made into an executable# Unix shell script. (Modified from a script by Rahul Dhesi.)sed '/^end/,/^begin/d' file1 file2 ... fileX | uudecode # vers. 1sed '/^end/,/^begin/d' "$@" | uudecode # vers. 2# sort paragraphs of file alphabetically. Paragraphs are separated by blank# lines. GNU sed uses \v for vertical tab, or any unique char will do.sed '/./{H;d;};x;s/\n/={NL}=/g' file | sort | sed '1s/={NL}=//;s/={NL}=/\n/g'gsed '/./{H;d};x;y/\n/\v/' file | sort | sed '1s/\v//;y/\v/\n/'# zip up each .TXT file individually, deleting the source file and# setting the name of each .ZIP file to the basename of the .TXT file# (under DOS: the "dir /b" switch returns bare filenames in all caps).echo @echo off >zipup.batdir /b *.txt | sed "s/^\(.*\)\.TXT/pkzip -mo \1 \1.TXT/" >>zipup.bat
Subscribe to:
Posts (Atom)


 Posts
Posts

